This tool was developed by Zealous™
Zealous™ is a technology-driven company delivering scalable, innovative and future-ready digital solutions. We specialize in building high-quality products powered by engineering excellence, data-driven insights and emerging technologies.
🌐 Website: zealous.tech
The TestRail reporter package currently supports Vitest, Playwright, Cypress, Mocha and Jest test frameworks. The support for other runners currently in the development process.
The package allows you to synchronize auto test results with associated TestRail tests through simple configuration.
- Features
- Installation
- TestRail Configuration
- Usage
- Reporter Workflow
- Comparison with TestRail CLI
- Self testing
- License
The reporter supports the following features
- Supports Vitest, Jest, Cypress, Mocha, Playwright testing frameworks.
- Associate Vitest, Jest, Cypress, Mocha, Playwright tests with TestRail tests.
- Generate a run in TestRail using specified test cases or all available test cases. Alternatively, the reporter can connect to and utilize an already created test run (manually initiated through the TestRail graphical user interface).
- Update the test run results in TestRail either after running all test cases or simultaneously.
- You have an option to update the test results of the same test run which executed several times, by saving all history data. Or you can create a new test run for every execution.
- If a test case fails, you can observe an error message in the comment field of the TestRail test result.
- Supports screenshots and videos attachment to the test results for Playwright and only screenshots for Vitest.
To install testrail-reporter, use the following command:
npm install @zealteam/testrail-reporter --save-dev
You should Enable API and Enable session authentication for API from testrail settings(It can be enabled in the administration area in TestRail under Administration > Site Settings > API.)
There are no specific requirements for the TestRail project, we support all three types.
Create a testrail.config.js file in your project's root directory. Enter the following credentials in the file:
module.exports = {
    base_url: "https://example.testrail.io",
    user: "username",
    pass: "password",
    project_id: 1,
    suite_id: 1,
    create_missing_cases: true,
    testRailUpdateInterval: 0,
    updateResultAfterEachCase: true,
    use_existing_run: {
        id: 0,
    },
    create_new_run: {
        include_all: false,
        run_name: "Test Run",
        milestone_id: 0
    },
    status: {
        passed: 1,
        failed: 5,
        untested: 3,
        skipped: 6
    }
};Click to see all options
-
base_url- Replace "https://example.testrail.io" with the actual base URL of your TestRail instance.
-
user- Replace "username" with the actual username of your TestRail account.
-
pass- Replace "password" with the actual password of your TestRail account.
-
project_id and suite_id- Replace the values of project_id's and suite_id's with the corresponding values specific to your project..
-
create_missing_cases- Default isfalse- If set to true, the reporter will collect test cases without TestRail case IDs in test title and create them in TestRail under given project and suite.
- After missing cases are created, the reporter will create/update
testrail_created_cases.jsonfile in the root directory of your project. This file will contain the mapping of the test case title, TestRail case ID, section ID and suite ID. - If the test case has a title that matches an existing test case in TestRail, the reporter will warn you about the existing case and will skip creating a new one.
- After missing cases are created, the reporter will create/update
- If set to true, the reporter will collect test cases without TestRail case IDs in test title and create them in TestRail under given project and suite.
-
testRailUpdateInterval- Default is0(seconds).- When set to 0, the test results will be updated in TestRail after all tests have been executed.
- If set to another value (e.g., 10), the test results will be updated in TestRail every 10 seconds.
- If set to a value greater than 59, it will be rounded to minutes, and the results will be updated in TestRail every specified minute.
-
updateResultAfterEachCase- Default istrue. Please note that this configuration is only compatible with Playwright.- If set to
truethe test results will be updated in TestRail after each test have been executed andtestRailUpdateIntervalconfig will be ignored. - If set to
falsethe test results will be updated in TestRail based on thetestRailUpdateIntervalvalue.
- If set to
-
use_existing_run-
id- Default is0.- You have the option to supply an existing test run
idfrom your TestRail. When anidis provided, your results will be stored in the designated test run, and the reporter will ignore the configurations within thecreate_new_runsettings. The same test run will be updated on subsequent runs, and historical data will be maintained within that run.
- You have the option to supply an existing test run
-
NOTE: The configs under create_new_run will be used if id is 0.
-
create_new_run-
run_name- If you want to create a new run in TestRail, you can provide a value for
run_nameor the reporter will use the defaultTest Runvalue. The run name will be composed of the following combination:'<run_name> <current_date>(e.g.,Test Run 22.1.2024).
- If you want to create a new run in TestRail, you can provide a value for
-
include_all- Default isfalse- When set to false, the newly created TestRail's test run will only include the test cases that are scheduled to execute from Vitest.
- When set to true, the newly created TestRail's test run will include all test cases within the specified test suite from TestRail.
-
milestone_idDefault is0- If you have a milestone in your TestRail, you can set the
milestone_id. The configuration will be ignored if the value is 0.
- If you have a milestone in your TestRail, you can set the
-
-
status- The
statusconfiguration in the provided module is a set of status mappings used to interpret and communicate the test results to TestRail. You should configure your case statuses from TestRail(Administration > Customizations > RESULT STATUSES) and set to provided configuration
- The
status: {
    passed: 1,
    failed: 5,
    untested: 3,
    skipped: 6
}
Here is a quick GIF demonstrating how to configure your project.
To generate a report with Vitest, Jest, Cypress, Mocha, or Playwright and upload it to TestRail, follow these steps:
Click to see Playwright usage
Open your config file (e.g., playwright.config.js or playwright.config.ts)
and add '@zealteam/testrail-reporter' into the reporters array.
export default defineConfig({

...

    reporter: [['list'], ['@zealteam/testrail-reporter']],

...

});Write your tests using Playwright, ensuring that each test has appropriate assertions and result statuses. You should include the TestRail test case IDs in the test names to link it to corresponding case. For example:
test("@C123 has title", async ({ page }) => {
    // Test logic here
});
In above example @C123 represents the TestRail test ID. Replace '@C123' with the actual test ID from TestRail.
WARNING: If your test cases are already created in TestRail and has a test step, you should write your test cases in a way that the test steps are executed in the same order as in TestRail.
Test case example with test steps
test("@C123 has title", async ({ page }) => {
    await test.step("Step 1", async () => {
        // test step logic here
    });
    await test.step("Step 2", async () => {
        // test step logic here
    });
});No extra configuration is needed in the testrail.config.js file. Instead, you can use Playwright configurations to generate screenshots and videos.
For instance, if you want to capture a screenshot when a test fails,
you should include the following configuration in your config file (e.g., playwright.config.js or playwright.config.ts):
export default defineConfig({

...

    use: {
        screenshot: 'only-on-failure',
        video: 'retain-on-failure',
    },

...

});
Generated screenshots will be available in testrail run tests' attachments.
npx playwright test
INFO:
The TestRail reporter will collect the test results, and will automatically update the test results in TestRail Test Run.
TestRail Run url will be printed in the console after the test execution.
Click to see Vitest usage
Open your config file (e.g., vitest.config.js or vitest.config.ts) and add '@zealteam/testrail-reporter' into the reporters array.
teardownTimeout: 200000,
reporters: ['default', '@zealteam/testrail-reporter'],
WARNING:
It is advisable to include the
teardownTimeoutin any of these configurations since the reporter may run after the tests have completed, and setting it to a large number is recommended.You must include the
defaultrunner or your tests won't run properly.
Write your tests using Vitest, ensuring that each test has appropriate assertions and result statuses. You should include the TestRail test case IDs in the test names to link it to corresponding case. For example:
it('@C123 adds 1 + 2 to equal 3', async () => {
    expect(1 + 2).toBe(3);
});
In above example @C123 represents the TestRail test ID. Replace '@C123' with the actual test ID from TestRail.
WARNING: Test steps are not supported in Vitest.
Need to have configured provider to capture screenshots for failed test cases.
For instance, if you want to capture a screenshot when a test fails,
you should include the following configuration in your config file (e.g., vitest.config.js or vite.config.js):
export default defineConfig({

...

    test: {
        environment: 'jsdom',
        browser: {
            enabled: true,
            // browser name is required
            name: '<browser>', // chromium, firefox, webkit
            provider: 'playwright', // or 'webdriverio'
            screenshotFailures: true,
            // screenshots will be saved in this directory
            screenshotDirectory: '<path>',
        },
    },

...

});
NOTE: regardless your provider choice, you should install the corresponding provider package.
For more details about the provider installation visit Vitest documentation.
Vitest provider configuration is available in Vitest documentation.
Generated screenshots will be available in testrail run tests' attachments.
npx vitest test
or
npm run test:unit
by default above command comes with the following script configuration in the package.json file,
"scripts": {
...
"test:unit": "vitest"
...
},
WARNING: Don't use this one
vitest run
CAUTION
If your project is based on vite/vue, you should replace the value of
typekey frommoduletocommonjsin thepackage.jsonfile.
...
"type": "commonjs",
...
INFO:
The TestRail reporter will collect the test results, and will automatically update the test results in TestRail Test Run.
TestRail Run url will be printed in the console after the test execution.
Click to see Jest usage
Open your Jest config file (e.g., jest.config.js or jest.config.ts) and add '@zealteam/testrail-reporter' to the reporters array.
    teardownTimeout: 200000,
    reporters: ['default','@zealteamtestrail-reporter']
Update test case with TestRail ID
Write your tests using Jest, ensuring that each test includes appropriate assertions and result statuses.
You should include the TestRail test case IDs in the test names to link them to corresponding cases. For example:
test('@C123 adds 1 + 2 to equal 3', () => {
    expect(1 + 2).toBe(3);
});
In the example above, @C123 represents the TestRail test case ID. Replace @C123 with the actual test ID from TestRail.
For more details about the provider installation visit Jest documentation.
Jest provider configuration is available in Jest documentation.
npx jest
or
npm run test:unit
by default above command comes with the following script configuration in the package.json file,
"scripts": {
...
"test:unit": "vitest"
...
},
...
Click to see Mocha usage
Open your Mocha config file (e.g., .mocharc.js or .mocharc.json) and add '@zealteam/testrail-reporter' as the reporter or install mocha-multi-reporters plugin for mocha if you want use multiple reporter.
module.exports = {
    reporter: '@zealteam/testrail-reporter'
}
You can also run it directly using CLI:
npx mocha --reporter @zealteam/testrail-reporterWrite your tests using Mocha, ensuring that each test includes appropriate assertions and result statuses.
You should include the TestRail test case IDs in the test names to link them to corresponding cases. For example:
describe('Math operations', () => {
    it('@C123 adds 1 + 2 to equal 3', () => {
        if (1 + 2 !== 3) throw new Error('Assertion failed');
    });
});
In the above example, @C123 represents the TestRail test case ID. Replace it with the actual ID from TestRail.
npx mochaor
npm testClick to see Cypress usage
Open your Cypress config file (e.g., cypress.config.js or cypress.config.ts) and add '@zealteam/testrail-reporter' as the reporter or, if you want to use multiple reporters, use the cypress-multi-reporters plugin and then specify the reporters in the configuration file..
const { defineConfig } = require('cypress');

module.exports = defineConfig({
    reporter: '@zealteam/testrail-reporter'
});Write your tests using Cypress, ensuring that each test includes appropriate assertions and result statuses.
You should include the TestRail test case IDs in the test names to link them to corresponding cases. For example:
describe('Calculator', () => {
    it('@C123 adds 1 + 2 to equal 3', () => {
        expect(1 + 2).to.equal(3);
    });
});
In the above example, @C123 represents the TestRail test case ID. Replace it with the actual ID from TestRail.
npx cypress runor
npm run cypress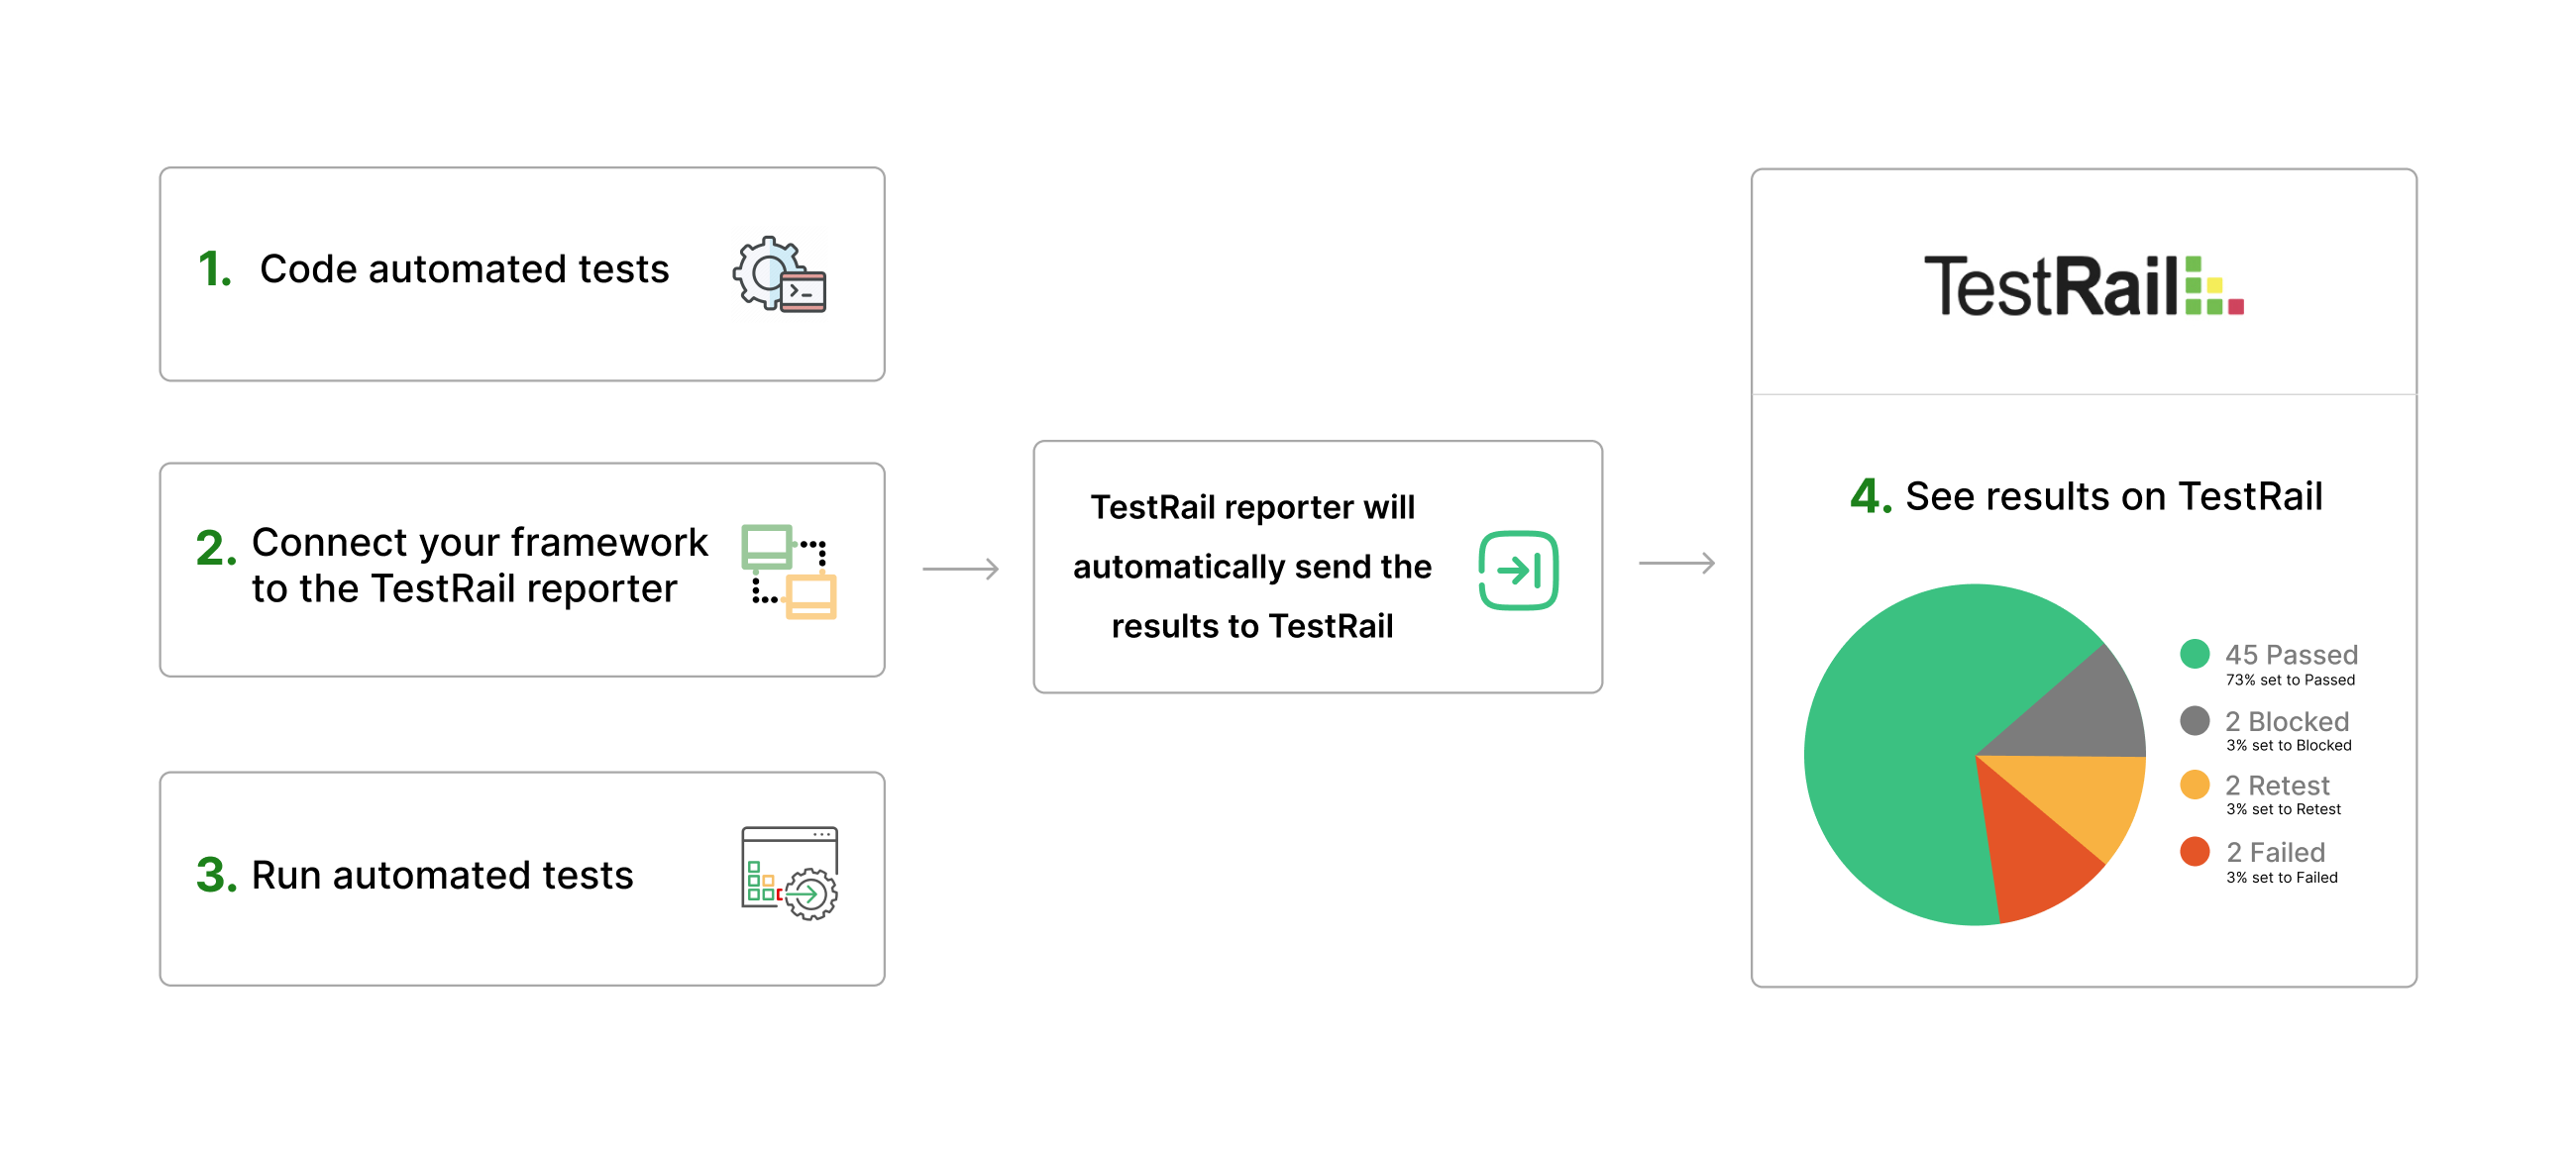
Differences between testrail-reporter and TestRail CLI (The TestRail CLI is a command-line interface tool developed by the TestRail team, allowing users to upload test automation results from any JUnit-style XML file to TestRail.)
| Feature | testrail-reporter | TestRail CLI |
|---|---|---|
| Simultaneously Result Updates | Supported | Not supported |
| Specify an Interval to Periodically Update Results | Supported | Not supported |
| Custom Status Support (xfail, fixed) | Support is Currently in Development | Not supported |
| Updating Results After Running All Test Cases | Supported | Supported |
| Storing Step Results | Supported | Supported |
| Adding Comment to the Results | Supported | Supported |
| Creating New Run | Supported | Supported |
| Updating Existing Run | Supported | Supported |
| Attaching Screenshots or Logs | Supported | Supported |
| Adding New Case to Test Suite | Supported | Supported |
| Adding New Case to Existing Test Run | Support is Currently in Development | Supported |
To test the reporter, you can use the following steps:
- clone the repository
- run
npm installto install the dependencies - navigate to the
testfolder - choose the framework you want to test with
- navigate to the
playwrightfolder - run
npm installto install the dependencies - set your testrail configurations in the
testrail.config.jsfile - update the
playwright.config.tsfile if needed - set log level in src/logger.js file to
debugfor more detailed logs - run
npx playwright testto run the tests
- navigate to the
vitestfolder - run
npm installto install the dependencies - set your testrail configurations in the
testrail.config.jsfile - update the
vitest.config.tsfile if needed - set log level in src/logger.js file to
debugfor more detailed logs - run the tests using the appropriate script from the
package.jsonfile. For examplenpm run e2eSmokeTestsor add your custom command
- navigate to the
jestfolder - run
npm installto install the dependencies - set your testrail configurations in the
testrail.config.jsfile - update the
jest.config.tsfile if needed - set log level in src/logger.js file to
debugfor more detailed logs - run the tests using the appropriate script from the
package.jsonfile. For examplenpm run testor add your custom command
- Navigate to the
mochafolder - Run
npm installto install the dependencies - Set your TestRail configurations in the
testrail.config.jsfile - Update the
.mocharc.jsor.mocharc.jsonfile if needed - Set log level in
src/logger.jsfile todebugfor more detailed logs - Run the tests using the appropriate script from the
package.jsonfile, for examplenpm run testornpx mocha
- Navigate to the
cypressfolder - Run
npm installto install the dependencies - Set your TestRail configurations in the
testrail.config.jsfile - Update the
cypress.config.jsorcypress.config.tsfile if needed - Set log level in
src/logger.jsfile todebugfor more detailed logs - Run the tests using the appropriate script from the
package.jsonfile, for examplenpm run cypressornpx cypress run
This project is licensed under the MIT License - see the LICENSE file for details.