UNetyEmuROS: A Unity-Based Multi-Vehicle Simulator with Physically-Grounded Dynamics and ROS2 Sensor Integration
We present UNetyEmuROS, a Unity-based multi-vehicle simulator that extends our previous work UNetyEmu with two key contributions: (i) a physically-grounded dynamics engine featuring per-motor forces, cascaded PID attitude control, and actuator disk energy modeling, where picking up a package physically alters thrust demand, inertia, and battery drain as emergent behavior; and (ii) a modular ROS2 sensor bridge publishing 360-LiDAR, RGB and depth camera, IMU, and GPS as standard sensor msgs topics, each independently attachable to any vehicle. We validate both contributions in an urban scenario with heterogeneous drones and ground vehicles operating concurrently on package delivery tasks, object detection, and teleoperation through ROS.
UNetyEmu-main/
├── UNetyEmuROS/                                  # Unity project
│   └── Assets/Scripts/
│       ├── CameraView/                           # Follow camera and HUD
│       ├── Classes/                              # PID, VectorPID, RatePD, SetLogs
│       ├── Components/
│       │   ├── Car/
│       │   │   ├── Dynamic/CarDynamics.cs
│       │   │   ├── Inputs/MoveCarKeyboard.cs     # Move vehicle from Unity
│       │   │   └── SaveLogs/SaveCarLogs.cs
│       │   └── Drone/
│       │       ├── Actuator/                     # DronePickUpPackage, DronePropellersRotation
│       │       ├── Controller/                   # DronePositionVelocityController, DroneStabilizationController
│       │       ├── Dynamic/              ← Key contribution 1
│       │       ├── EnergyConsumption/            # DroneEnergyConsumption
│       │       ├── Inputs/                       # DroneSetTarget, MoveDroneKeyboar (from Unity)
│       │       ├── Interaction/                  # AttachObject
│       │       ├── Planning/                     # DroneMissionPlanner, DroneWaypointFollower
│       │       └── SaveLogs/                     # SaveDroneLogs
│       ├── MenuInfo/                             # InfoPanelController
│       ├── ROS2/                         ← Key contribution 2
│       │   ├── Publishers/                       # LidarROS, RGBCameraROS, DepthCameraROS, GPSROS, IMUROS
│       │   └── Subscribers/                      # MissionReceiver, WaypointReceiver, MoveDroneROS (from ROS), MoveCarROS (from ROS)
│       └── SensorsConfig/                        # LinearDepthShader.shader
├── ros2_ws/
│   ├── src/
│   │   ├── ROS-TCP-Endpoint/                     # TCP bridge package (Unity ↔ ROS2)
│   │   └── examplePackage/                       # ROS2 nodes
│   │       └── examplePackage/
│   │           ├── applyYolo.py                  # YOLOv8 on RGB camera stream
│   │           ├── cameraReceiver.py             # Displays RGB camera feed
│   │           ├── carKeyboardControl.py         # Real-time teleoperation of the car
│   │           ├── droneKeyboardControl.py       # Real-time teleoperation of the drone
│   │           ├── missionPublisher.py           # Send a sequence of steps to follow during a mission
│   │           ├── waypointPublisher.py          # Send new target
│   │           └── missions/mission.json         # Define the list of steps for the mission
│   ├── config/
│   │   └── unity_ros2_visualTest.rviz
│   └── connect.sh                                # Sources setup.bash and runs ros_tcp_endpoint
├── rviz/
│   └── UNetyEmuROS_sensors.rviz                  # RViz2 sensor visualization config
├── launchDemo.sh                                # Launches the complete demo
├── runROS.sh                                     # Starts the ROS2–Unity TCP bridge
├── buildWorkspace.sh                             # Builds the ROS2 workspace with colcon
└── loadUNetyEmu.py                               # Downloads and launches the Unity build
The authors of this work consider applying to the following badges: "Artefatos Disponíveis (SeloD)", "Artefatos Funcionais (SeloF)", "Artefatos Sustentáveis (SeloS)", and "Experimentos Reprodutíveis (SeloR)".
To validate our contributions, we designed an urban delivery scenario that simultaneously tests the flight dynamics engine and the ROS2 sensor integration. The scene represents a simple urban environment with roads, buildings, and trees, in which 4 ground vehicles and 3 drones of different types operate simultaneously within the same Unity scene. The drones differ in size, mass, and equipped components, as summarized in the next Table. The first 3 ground vehicles are parked and remain stationary, using their dynamic components to interact with the scene. Meanwhile, the last ground vehicle, equipped with GPS and IMU sensors, is teleoperated from ROS2 using keyboard inputs.
| Vehicle | Size | Sensor | Control | ROS2 topic |
|---|---|---|---|---|
| Drone 1 | Medium | 360-LiDAR | LoadMission() |
PointCloud2 |
| Drone 2 | Large | Depth Camera | SetTarget() |
Image (32FC1) |
| Drone 3 | Small | RGB Camera | Keyboard teleop | Image (rgb8) |
| Car 1 | Medium | GPS + IMU | Keyboard teleop | NavSatFix, Imu |
- Ubuntu 22.04 LTS (Linux x86_64)
| Component | Minimum | Recommended |
|---|---|---|
| CPU | 4 cores | 8 cores |
| RAM | 8 GB | 16 GB |
| GPU | Integrated | Dedicated GPU (NVIDIA or AMD) |
| Disk | 5 GB free | 10 GB free |
Note: A dedicated GPU is recommended for smooth rendering of the Unity scene with multiple active vehicles and sensors.
- Run quick demo (no Unity Editor): uses a pre-built Linux executable downloaded automatically on first run.
- Full project (with Unity Editor): allows opening, modifying, and recompiling the scene. Additionally requires Unity 2022.3.62f2.
| Dependency | Version |
|---|---|
| Ubuntu | 22.04 LTS |
| ROS2 | Humble |
| ROS-TCP-Connector | Included in the Unity packages |
| ROS-TCP-Endpoint | Included in the workspace ros2_ws/src/ |
| RViz2 | Included with ROS2 Desktop |
| Python | 3.10+ |
| gnome-terminal + xterm | Any |
| pip | 22.0.0+ |
| Package | Version |
|---|---|
| numpy | 1.26.4 |
| opencv-python | 4.8.1.78 |
| readchar | Latest |
| Package | Version |
|---|---|
| torch | 2.11.0+cpu |
| torchvision | 0.26.0+cpu |
| ultralytics | 8.4.36 |
| polars | Latest |
| ultralytics-thop | Latest |
| Package | Description |
|---|---|
examplePackage |
ROS2 nodes: keyboard control, mission publisher, waypoint publisher, camera receiver, YOLOv8 detection |
| Dependency | Version |
|---|---|
| Unity Hub | Latest |
| Unity Editor | 2022.3.62f2 |
The execution of this artifact is risk-free for evaluators. UNetyEmuROS uses as its core operation, documented frameworks and openly available online such as Unity and ROS2.
For convenience, we provide two preconfigured virtual machine images (.ova) that already include all required dependencies and the project fully configured, ready to run without manual installation.
Running either virtual machine requires a host computer with sufficient resources, since the VM runs both Unity and the ROS2 environment internally. We recommend the following minimum specifications:
| Component | Minimum | Recommended |
|---|---|---|
| RAM | 12 GB | 16 GB or more |
| CPU | 4 cores | 6 cores or more |
| Disk Space | 40 GB free | 60 GB free (Full version) |
| GPU | Not required | Dedicated GPU for better Unity performance |
Quick Demo — ROS2 + pre-built Unity executable (estimated size: 10 GB)
https://drive.google.com/file/d/1sLCmxuaGIYozZTQy12e_1Z_PDIEq_5Yq/view?usp=sharing
Full Project — ROS2 + Unity Editor included (estimated size: 15 GB)
https://drive.google.com/file/d/1y3og7DFiSzEFlu5gv2B32OJfOoLnOPkV/view?usp=sharing
The Quick Demo version is recommended for users who only want to run the demonstration.
The Full Project version includes the Unity Editor, allowing scene modification.
These images were exported using VirtualBox 7.2.6. To ensure proper import, download VirtualBox 7.2.6 or newer for your platform (Windows or Linux) from the official website: https://www.virtualbox.org/wiki/Downloads
Open VirtualBox and go to:
File → Import Appliance
Then select the downloaded .ova file.
Inside the virtual machine, the project is located at:
/home/unetyemuros/git/UNetyEmuIf a password is required, use:
unetyemuros
Note: Allocating fewer resources than recommended may result in lower performance or instability during simulation. If your machine does not have enough available resources, we recommend installing the simulator directly on your host computer instead. Follow the steps below.
Follow our documentation in the Installation section, with step-by-step instructions.
sudo apt update
sudo apt install gnome-terminal xterm python3-pipThis will install all dependencies with their required versions.
- Simulator core:
pip install numpy==1.26.4
pip install opencv-python==4.8.1.78 --no-deps
pip install readchar- For the demo with object detection using YOLO:
pip install torch torchvision --index-url https://download.pytorch.org/whl/cpu
pip install ultralytics==8.4.36 --no-deps
pip install polars ultralytics-thop
Note:
ultralyticsis installed with--no-depsto avoid version conflicts withnumpyandopencv.torchand its companions are installed separately for the same reason. In addition, if you see a warning that the install path is not inPATH:echo 'export PATH="$HOME/.local/bin:$PATH"' >> ~/.bashrc source ~/.bashrc
git clone https://github.com/intrig-unicamp/UNetyEmu.git
cd UNetyEmu
or download the zipped project and navigate to the project's root folder UNetyEmu-main/.
The installation is now complete to run the quick demo using the pre-built Unity file.
To edit the scene and open the Unity project, follow our documentation in the Installation section, with step-by-step instructions.
Then check out our Basic-Information section in the documentation, to better understand how to run the experiments using the scene in the Unity Editor.
To run the quick demo, make sure you're in the project root directory UNetyEmu, and execute the following:
./launchDemo.shThis bash script will build the ROS 2 workspace and open 3 terminals:
- Terminal 1 — Download and launch the Unity executable
- Terminal 2 — Run ROS-Unity bridge
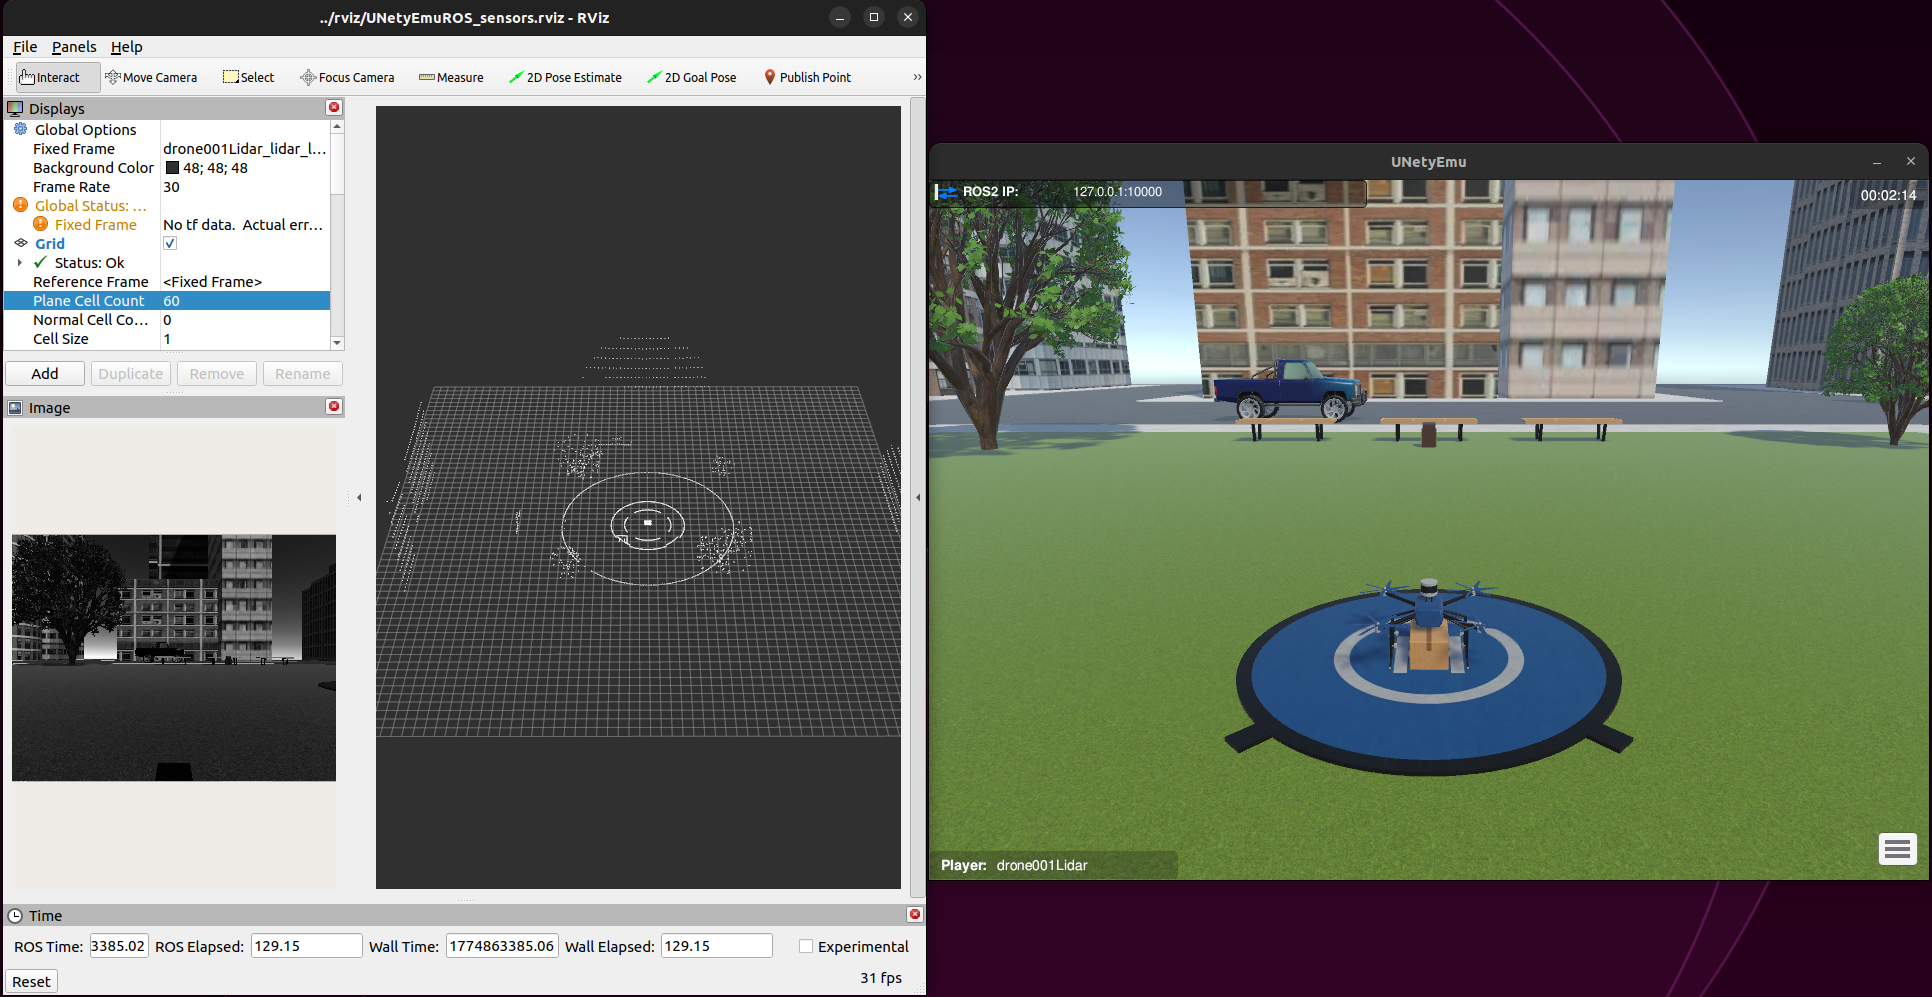
- Terminal 3 — Launch RViz
In summary, the connection between ROS and Unity has been established, and you will see both the Unity scene window and the rviz window, where you can view the sensor output.
For more details, please refer to the relevant section in our documentation: Minimum Test.
In this demonstration, you can perform 4 different experiments in which various drones and cars interact within the same scene.
First, add ROS2 to your .bashrc so that RViz2 work in any terminal:
echo "source /opt/ros/humble/setup.bash" >> ~/.bashrc
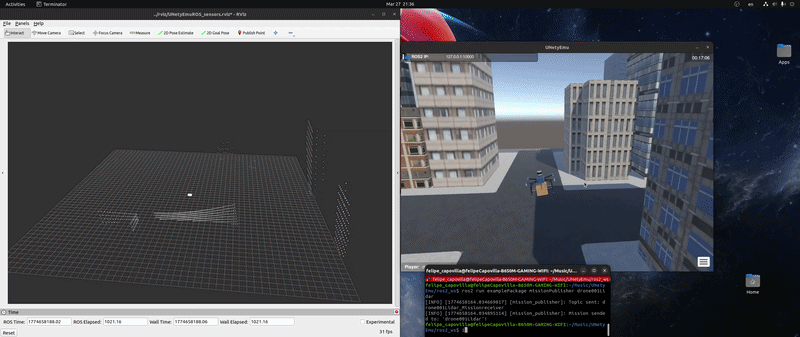
source ~/.bashrc1. Autonomous delivery with 360-LiDAR: Sending a mission to drone001 and check the response from the Lidar sensor
Open a new terminal. Go to the root folder of our project UNetyEmu, and run the following:
cd ros2_ws
source install/setup.bash
ros2 run examplePackage missionPublisher drone001Lidar
This commands will allow you to send a list of steps to follow (pick up the package, take off, cruise mode, etc.) so that drone001 can autonomously deliver a package.
In addition, in RViz2 you can see the point cloud updating in real-time as the drone makes the delivery.
IMPORTANT NOTE: This command will behave as expected if it is executed ONLY ONCE at any point during the simulation. For a better understanding of how the drone executes this mission, please refer to our documentation.
To view drone002, click within the open Unity scene and then click the menu button in the bottom right corner. A list of all available keyboard commands will appear.
Switch the view in Unity until dron002 appears. For that, press the C key once.
Open a new terminal. Go to the root folder of our project UNetyEmu, and run the following:
cd ros2_ws
source install/setup.bash
ros2 run examplePackage waypointPublisher drone002Camera
This terminal will stay open to send new target positions to drone002. For example, an input of 5 10 5 90 3 will send a command to drone002 to fly to the position longitude x=5, altitude y=10, latitude z=5, with an orientation of 90 degrees and a speed of 3 m/s.
Note: Follow our documentation for a better understanding of how to view the depth camera output of
drone002onRViz2.
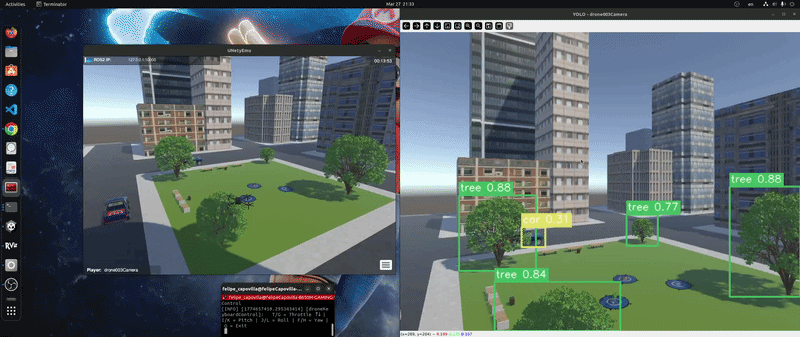
3. RGB camera, object detection, and teleoperated: Remote Control and object detection with the drone003
Switch the view in Unity until dron003 appears (pressing the C or V key).
For this last experiment, you will need to open two terminals.
In the first terminal, go to the root folder of our project UNetyEmu, and run the following:
cd ros2_ws
source install/setup.bash
ros2 run examplePackage droneKeyboardControl drone003Camera
This will allow you to enable remote control of drone003. Be sure to check the available control keys, which can be found in the Unity scene menu.
Then, in the second terminal, go to the root folder of our project UNetyEmu, and run the following:
cd ros2_ws
source install/setup.bash
ros2 run examplePackage yolo_detector drone003Camera
This will allow you to run and observe object detection in real-time using a YOLOv8 node trained to detect trees and ground vehicles.
Note: Since this is a demonstration, this script will run the YOLO node using only the CPU to avoid compatibility issues between the GPU and PyTorch/CUDA.
Switch the view in Unity until car001 appears (pressing the C or V key).
Open a new terminal. Go to the root folder of our project UNetyEmu, and run the following:
cd ros2_ws
source install/setup.bash
ros2 run examplePackage carKeyboardControl car001
The terminal will be enabled to accept keyboard input and allow you to remotely control car001, which is currently in the scene.
Note: Follow our documentation for a better understanding of how to use the keys to properly control the car.
Apache License Version 2.0, January 2004 http://www.apache.org/licenses/