Setting up PostgreSQL
HOME > SNOWPLOW SETUP GUIDE > Step 4: setting up alternative data stores > Setup PostgreSQL
- Setting up PostgreSQL on a EC2 instance
- Setting up PostgreSQL on Debian / Ubuntu
- Creating the Snowplow events table in PostgreSQL
- Next steps
Note: We recommend running all Snowplow AWS operations through an IAM user with the bare minimum permissions required to run Snowplow. Please see our IAM user setup page for more information on doing this.
### 1.1 Setup an EC2 instance to run PostgreSQL serverIf you do not have a server / EC2 instance already available to run PostgreSQL, you will need to create one. (If you do have one, skip to the next step, installing PostgreSQL).
Log into the AWS console, navigate to the EC2 section:

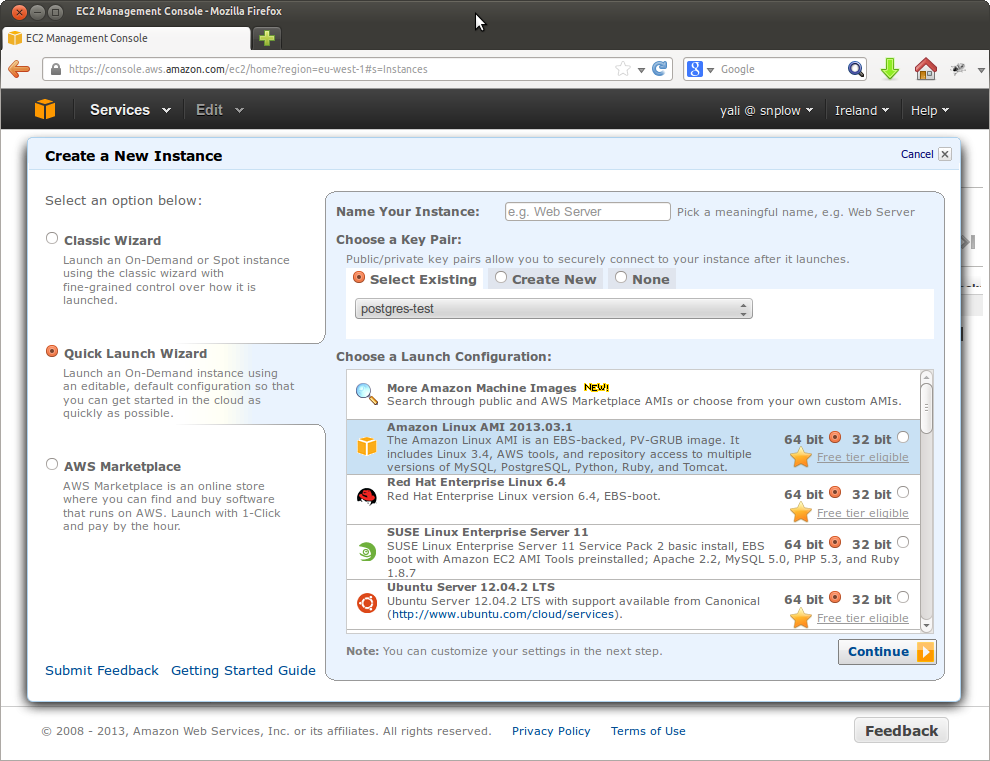
Press the Launch Instance button. Select the Quick Launch Wizard:
Either create a new security key pair, or create and download a new key pair. If you have downloaded a new key pair (in the form of a .pem file), you will need to make sure it is not publically viewable, by executing the following at the command line:
$ chmod 400 $key-pair-name.pem
Choose to launch an Amazon Linux AMI instance, and press the Continue button.

Give your instance a name. Select a suitable instance type. (Note: if you are running a high traffic site, it makes sense to run a powerful instance e.g. one of the xlarge series.)

Click on the Continue button:

There are a number of important options here that are worth highlighting: exactly which you select will depend on your business:
Amazon offers a range of instances, with different costs and different configurations. Depending on your the number of events you expect to be tracking per day, it may make sense to select a larger, more powerful instance. Bear in mind though that these cost more.
We recommend that you create a new security group for your PostgreSQL instance. To do this, select Create new Security Group:

Enter a group name and click Create. Now add two rules, one enabling SSH access from 0.0.0.0/0, and a custom rule to enable access on PostgreSQL 5432 port:

Click Save.
When you are happy with the settings, click Launch. Note that in the example below, we are using a t1.micro instance for testing purposes.
To install PostgreSQL, you need to SSH into the instance that you want to setup PostgreSQL on, and install Postres. In this tutorial, we're going to connect via a standalone SSH client, but you can also connect through the web browser.(For full instructions on the different connection options, see the Amazon guide.)
To do that, go into the EC2 section of the AWS dashboard. Click on Instances link on the left hand menu. Right click on the instance you want to setup PostgreSQL on and click Connect. In the dialogue box that appears, open the drop down to Connect with a standalone SSH Client:

Copy the text that Amazon instructs you to enter at the command line to SSH into the instance. Then paste it into the command line. In our case, that text is:
$ ssh -i postgres-test.pem ec2-user@ec2-54-246-27-243.eu-west-1.compute.amazonaws.com
You should see something like this:
$ ssh -i postgres-test.pem ec2-user@ec2-54-246-27-243.eu-west-1.compute.amazonaws.com
The authenticity of host 'ec2-54-246-27-243.eu-west-1.compute.amazonaws.com (54.246.27.243)' can't be established.
RSA key fingerprint is 55:88:a8:9e:7d:fe:d1:23:8f:d3:15:06:d7:c5:29:19.
Are you sure you want to continue connecting (yes/no)? yes
Warning: Permanently added 'ec2-54-246-27-243.eu-west-1.compute.amazonaws.com,54.246.27.243' (RSA) to the list of known hosts.

       __|  __|_  )
       _|  (     /   Amazon Linux AMI
      ___|\___|___|

https://aws.amazon.com/amazon-linux-ami/2013.03-release-notes/
There are 6 security update(s) out of 11 total update(s) available
Run "sudo yum update" to apply all updates.
[ec2-user@ip-10-34-176-225 ~]$
Amazon helpfully keeps a range of packages including PostgreSQL in repos so that EC2 users can install them directly, using yum. To install PostgreSQL from one of these repos, enter the following at the command line:
$ sudo yum install postgresql postgresql-server postgresql-devel postgresql-contrib postgresql-docs
Initialize a database:
$ sudo service postgresql initdb
Then edit your pg_hba.conf file:
$ sudo vim /var/lib/pgsql9/data/pg_hba.conf
Update the bottom of the file, which will read something like this, by default:
# TYPE  DATABASE        USER            ADDRESS                 METHOD

# "local" is for Unix domain socket connections only
local   all             all                                     ident
# IPv4 local connections:
host    all             all             127.0.0.1/32            ident
# IPv6 local connections:
host    all             all             ::1/128                 ident
To read this:
# TYPE  DATABASE        USER            ADDRESS                 METHOD

# "local" is for Unix domain socket connections only
local   all             all                                     trust
# IPv4 local connections:
host    all             power_user      0.0.0.0/0               md5
host    all             other_user      0.0.0.0/0               md5
# IPv6 local connections:
host    all             all             ::1/128                 md5
Now that we've updated the authorization settings, we need to update PostgreSQL to enable remote connections to the database. At the command line enter:
$ sudo vim /var/lib/pgsql9/data/postgresql.conf
Uncomment line 59:
#listen_addresses = 'localhost' # what IP address(es) to listen on;
And update the line to enable connections from any IP address:
listen_address='*'
And uncomment line 63:
#port = 5432
So it reads
port = 5432
Now start the server:
$ sudo service postgresql start
Log into the server:
$ sudo su - postgres
$ psql -U postgres
And add a password for your PostgreSQL admin:
ALTER USER postgres WITH PASSWORD '$password';
Now we need to create user credentials for power users. These users will be able to perform any action on the database:
CREATE USER power_user SUPERUSER;
ALTER USER power_user WITH PASSWORD '$poweruserpassword';
CREATE USER other_user NOSUPERUSER;
ALTER USER other_user WITH PASSWORD '$otheruserpassword';
CREATE DATABASE snowplow WITH OWNER other_user;
We can now exit from Postgres with \q. Setup is complete: we are ready to connect to our database remotely.
Now that we have PostgreSQL up and running on our EC2 instance, we are in a position to connect from a remote computer using a PostgreSQL client. We'll be using Navicat in this tutorial, but any PostgreSQL compatible client (there are 100s) should work in a similar way.
Fire up Navicat, and under Connection select PostgreSQL. A dialogue box appears, enabling us to enter details to connect to PostgreSQL:

Give the connection a suitable name. You can identify the EC2 public IP address (to enter in the Host name/IP Address field, by clicking on the instance in the AWS console and scrolling down in the properties section to Public DNS:

Copy and paste the value (in our case) ec2-54-216-22-100.eu-west-1.compute.amazonaws.com into the host field in Navicat.
Select either the username power_user and associated password you created in the previous step, or other_user. (Depending on the permissions you wish to grant.)

You should now be able to either test the connection or click OK to save the connection. You can then double click it to go into the database.
Back to top.
## 2. Setting up PostgreSQL on Debian / Ubuntu*Thanks to [Simon Rumble] simon-rumble for providing the following instructions:
Download PostgreSQL:
$ sudo apt-get install postgresql
Update pg_hba.conf - change 'local' to 'trust':
$ sudo nano /etc/postgresql/9.1/pg_hba.conf
Update postgresql.conf: uncomment line 59 to enable remote access (line `listen_address = 'localhost')
$ sudo nano /etc/postgresql/9.1/main/postgresql.conf
Note that on Debian, the default PostgreSQL port is 5433 rather than 5432 (on Red Hat).
Then restart PostgreSQL:
$ sudo /etc/init.d/postgresql restart
Log into PostgreSQL:
$ sudo su - postgres
$ psql
Update your Postres user credentials:
ALTER USER postgres WITH PASSWORD '$password';
CREATE USER power_user SUPERUSER;
ALTER USER power_user WITH PASSWORD '$poweruserpassword';
CREATE USER other_user NOSUPERUSER;
ALTER USER other_user WITH PASSWORD '$otheruserpassword';
CREATE DATABASE snowplow WITH OWNER other_user;
\q
Now log back into Postgres and with your new user credentials:
psql -U power_user snowplow
You can now Snowplow events table as described in the next step.
Back to top.
## 3. Create the Snowplow events table in PostgreSQLFire up your PostgreSQL client (e.g. Navicat or psql at the command line), and double click on the PostgreSQL database you've setup, and the Snowplow database within it.
Enter the two SQL queries given in the [PostgreSQL table definition] postgresql-table-def, to create your schema and table.
Back to top.
Now you have setup PostgreSQL, you are ready to setup the StorageLoader to automate the regular loading of Snowplow data into the PostgreSQL events table.