Demonstration Video:
DocM is a cutting-edge document management system designed to streamline document processing, extraction, and organization. By leveraging advanced AI capabilities, a robust backend infrastructure, and an intuitive user interface, DocM transforms unstructured information into structured, accessible data, ensuring seamless document management.
- Optical Character Recognition (OCR): Extracts text from scanned documents and images with high accuracy.
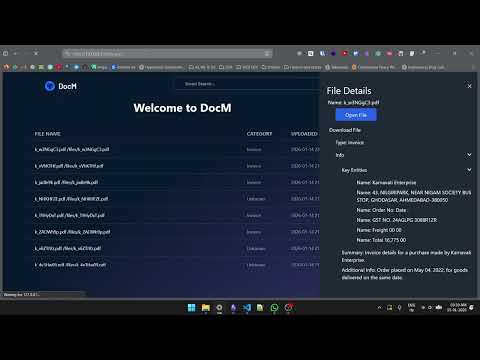
- Named Entity Recognition (NER): Identifies and categorizes key entities within documents, facilitating structured data extraction.
- Metadata Extraction: Captures and indexes relevant metadata for efficient document retrieval.
- Large Language Model (LLM) Integration: Enhances document comprehension and contextual analysis.
- Django-Powered Backend: Provides a scalable, secure, and efficient backend architecture.
- Intuitive UI/UX: Offers a seamless and user-friendly document handling experience.
- Optimized Frontend with Tailwind CSS: Ensures a visually appealing, responsive, and efficient user interface.
- Frontend: HTML, Tailwind CSS, JavaScript
- Backend: Django
- AI & NLP: Optical Character Recognition (OCR), Named Entity Recognition (NER), LLM APIs
- Database: Neon PostgreSQL
- Version Control: Git & GitHub
- Mohit Madhu(Team Lead): AI, OCR and NER
- Kaustubh Kadam: Frontend and Backend
- Mayank: Frontend
- Shrinivas: UI/UX
- Sambhav: API, AI and LLMOPS
To set up and run DocM locally, follow these steps:
-
Clone the repository:
git clone https://github.com/KadamKaustubh147/ai_doc_manager
-
Edit .env.template with related info and rename it to .env
-
Set up a virtual environment and install dependencies:
# On Linux/MacOS
python3 -m venv .venv
source .venv/bin/activate
# On Windows:
python -m venv .venv
.venv\Scripts\activate
pip install -r requirements.txt
-
Navigate to the project directory:
cd AiDocManager/ -
Start the development server:
python manage.py runserver
-
Install tailwind css:
python manage.py tailwind install
-
Access the application in your browser:
http://127.0.0.1:8000/
- First deactivate any web layer virtual environment or any other virtual environment
deactivate- Navigate to Ai_layer director
cd Ai_layer-
Set up a virtual environment and install dependencies:
# On Linux/MacOS
python3 -m venv .venv
source .venv/bin/activate

# On Windows:
python -m venv .venv
.venv\Scripts\activate

pip install -r requirements_ai.txt
-
Run the application
uvicorn main:app --port 9000