For the first lab, we will just focus on getting everyone set up with ROS 2 and ready to program and build robots.
In lab on Thursday, we will walk you through the basic concepts for ROS and play with some basic functionalities of it.
Fork the Mobile HRI Lab Page repository; detailed instructions for creating your lab hub and updating your labs are here.
When submitting your assignments, you will update your assignments on your class lab hub, and post a link to your Github lab page on Canvas. Graders will review the assignments sometime after the due date. Late assignments (e.g. your assignment is missing/incomplete at our grading time, which is after the due date) will be penalized by one letter grade per day late.
Install VSCode here.
Then, install Remote-SSH extension within VSCode.
Foxglove studio is a visualization tool for ROS 2. It is relatively new but very powerful. Please download it on you laptop here.
- For windows users, if you get a Windows Security Alert upon opening the app regarding network permissions, make sure you select both private (not selected by default) and public network.
Download VNC Viewer from here.
In the past, ROS has been very exclusive. Your kind of have to use a linux based system to use it. As an upgrade, ROS 2 now supports more platforms, but the community still prefers linux over other platforms. Try your best to install ROS on your laptop, but this is definitely not a requirement to complete the course. Even if you have trouble installing it, please still bring your laptop to the lab on Thursday.
If you have a linux system, great! Please follow the instructions here to install ROS 2 Humble. If possible, you should do desktop install ros-humble-desktop. Development tools are not required.
Install Ubuntu 22.04 system Here. Then follow the instructions here.
Method 1 (recommended): Windows setup is a bit harder than Linux machines. Please follow the instructions here to install ROS 2 Humble.
Method 2: As an alternative, you can leverage the power of Windows Subsystem for Linux (WSL) and install ubuntu 22.04 inside your windows machine. (For older version of Windows 10, follow instructions here.) Then, follow the linux installation instructions here to install ROS inside your WSL.
- This is not recommended because you may run into firewall issures. Also, you cannot connect to remote robots through your laptop later. However, this is a great way to do robot simulations.
Method 1: macOS is no longer a target platform for future ROS realeases, this means you need to compile it from source. If you have macOS Mojave (10.14) and some free time, give this a try. Otherwise, we will provide raspberry pi as alternatives during the lab.
Medthod 2: If you are familiar with docker, here is a docker image for you. This is not recommended because you are not able to connect to your remote robots from docker. This is only good for compiling and testing code.
If you have trouble installing ROS, please make sure your ssh is running properly before coming to the lab on Thursday. For Windows, please follow the guide here. Mac and Linux machines should have ssh by default.
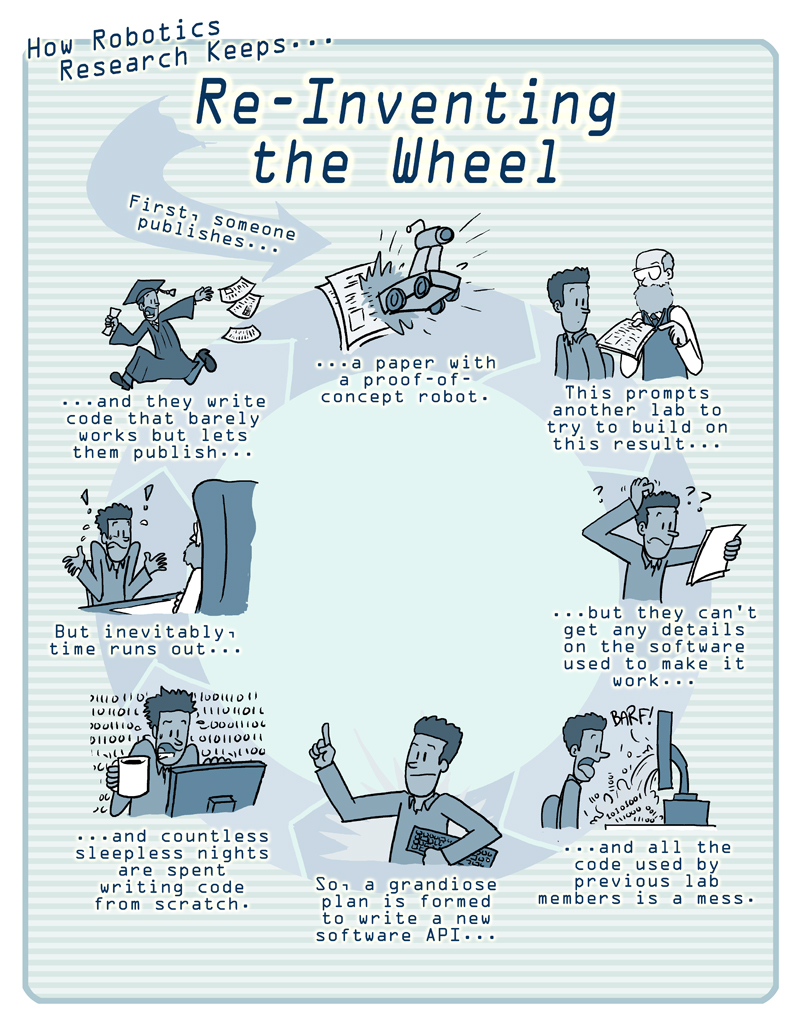
Robot Operating System (ROS) has been the standard open source tool for the robotics community since 2007. Before ROS, research labs tended to each have their own code base and infrastructure, which made sharing and collaboration very difficult to manage. ROS provides a unified space for the robotics community to contribute and share.
There are many distributions of ROS (for different operating systems, like Linux, Windows, and MacOS and new updates, like ROS 1 or ROS 2). Since ROS is initially (and still) mostly based on Linux systems, the release of ROS versions closely matches the release of Ubuntu operating systems. If you have worked with ROS before, you may probably know that there are 2 main versions of ROS: ROS 1 and ROS 2. In this class, we will use ROS 2 (called distribution Humble), which is the latest distribution of ROS 2. The documentation contains a lot of helpful information and tutorials, please take a moment and skim through the available resources listed on this website.
Since most students are using Mac, which does not support ROS natively, we decide to switch to a web-based development environment just for this lab to get you started on ROS 2 without dealing with the setup process (Thanks, Frank! -natalie).
You will need:
- Go the the Construct website and create a free account.
- On your home page, look to the panel on the left, click "My Rosjects"
- Click "Create a New Rosject", in the ROS Distro drop down, select
ROS2 Humble. - Name the project "lab0" and create the project.
The lab today is based on the tutorials on the official ROS 2 website. ROS tutorials are generally good, and the community is very friendly. However, when I first started learning ROS, I found the tutorials a bit hard to understand. Therefore, I added some of my own sauce to the tutorial and hopefully this will help you understand it a bit better. Please ask freely if you run into any questions, you should never be alone facing ROS problems.
Source the environment. You will hear me say this a lot. This is very important. Without sourcing your environment, your system doesn't know what ROS is.
So, what do I mean by "source the environment"? Officially, it means adding environment variables to the system path that are crucial for the system to identify and execute ROS functions (Got my answer from this forum). It simply means tell your system what ROS is and where it is. So, if your computer is asking you what ROS is, you probably forgot to source it.
To source ROS, open a terminal, aka, "Webshell" (on the bottom left corner) in your opened lab0 Rosject (click the terminal button in the bottom left corner), type in the following command:
source /opt/ros/humble/setup.bash
or if you are lazy, this works too:
. /opt/ros/humble/setup.bash
- By default, ROS will be installed in
/opt/ros/[Distro]/.
Whenever you open a new terminal that you want to run ROS in, you have to source it. I know that would be annoying. I have a solution: To make your life easier, you can add this command to . ~/.bashrc. It is a hidden file that will be executed automatically every time you open a new terminal. You're welcome. :)
Open the code editor (the button right of terminal that looks like this: < >) in your lab0 Rosject, click "File" -> "Open...", and find the file named ".bashrc" (it will have a purple icon). Open it, and add source /opt/ros/humble/setup.bash to the end. Save it.
According to the documentation, "a workspace is a directory containing ROS 2 packages."
So, it is a folder that will contain your code. That's all. However, there is one caveat here. This folder must follow a certain structure for ROS to work properly.
Go back to your terminal again, type the following command:
mkdir -p ~/mobilehri_ws/src
What does this mean?
Well, thought you would never ask.
mkdir is a linux command, which will create a directory(folder) in your current path. If I am in the folder \home\frank\, mkdir robot will create the folder \home\frank\robot. -p means creating parent directories if necessary. By default, you cannot create nested directories directly with mkdir. So, if you want to make a new folder that contains another folder, you need the -p flag.
This line of code is equivalent to the following lines of code.
cd ~                     # comment: move to home(~) directory
mkdir mobilehri_ws
cd mobilehri_ws
mkdir src
By convention, all the ROS code you right must live in the src directory.
- Take away here is that a ROS workspace is a directory/folder that contains another folder called
src. All your code must live insrc.
If you are familiar with Python, you must be familiar with packages like numpy and matplotlib. A package is just a way to efficiently group your code together. ROS is also organized by packages. You can create a package for your own robot to move around, to see, and to respond to the environment. Within a workspace, you can have as many packages as you want. Therefore, the convention in the ROS community is that you group similar functions in the same package, and name the package accordingly. Don't be afraid to create more packages, they can keep your code readable and clean.
Now, let's create a ROS package! yay.
Go to a terminal (aka, "webshell"):
# Remember what we said about workspace, your code and packages must live in the /src folder
cd ~/mobilehri_ws/src

ros2 pkg create --build-type ament_python my_package --dependencies std_msgs rclpy

# You will see that a bunch of files are generated for you automatically.
What did I just do?
By sourcing, your system now understands what `ros2` means. ROS comes with a list of prebuild functions for your convenience. Type `ros2 -h` in your terminal to see all of them.
ros2 pkg create basically tells ROS that you are creating a package.
--build-type indicates what language you will use predominantly for the package. If you mostly use C and C++, you should set this to ament_cmake. If your code only contains python, set it to ament_python. (read more here). Yes, you mix python and C++ within a package, but in general it's not necessary.
my_package is just the package name, it's whatever you want. It is always a good practice to forbid the space character in package names.
--dependencies: you will need this if you know what other packages your package will use. For example, std_msgs is a library for standard messages (such as strings), so it is always a good idea to include it. rclpy is short for ROS Client Library for Python. You always need it if you are writing ROS code in Python.
- After creating your package, what if you realize that you need to add other dependencies? Check the file tree below, you are able to add more dependencies in package.xml. Open it and see what's inside.
Now, look inside your /src folder. It should contain another folder called my_package.
Your current workspakce should look like this. Notice the nested folder with the same name my_package.
mobilehri_ws/
    src/
        my_package/
            my_package/          # Where your actual python code will live
            package.xml          # Package info, can add more dependencies
            resource/            # autogenerated by python
            setup.cfg            # autogenerated to create executables
            setup.py             # can add entry_points (terminal shortcuts)
            test/
Before we go any further, let's talk about some of the core concept of ROS. In a nutshell, ROS is simply a middleware that allows you to communicate with robots, and let robots communicate with other robots. Therefore, the core functionality of ROS is simply communicating.
If you are familiar with the concept of graphs, ROS 2 system can be thought of as a graph of nodes and edges, where nodes represent processes and edges represent communication.
Within the ROS graph, the most common concepts are the following:
(ROS Wiki Version)
Nodes: A node is an entity that uses ROS to communicate with other nodes.

Messages: ROS data type used when subscribing or publishing to a topic.

Topics: Nodes can publish messages to a topic as well as subscribe to a topic to receive messages.
(Frank's version) I will try to make some analogies here, but please ask if this isn't clear.

ROS is a graph that contains nodes and edges, so we can think of it as a network of nodes.
I am going to make the analogy between ROS network and a network of people (social networks?).

Nodes: In our people network analogy, a node is kind of like a person.
They can either listen or speak, or doing both at the same time! A node will execute whatever task (open a camera, do some math, stream audio)
you assign it and share the result with others.

Messages: The data content that is being passed around by nodes.
In our analogy, they are content that one says to another.

Topics:  In our people network example, this can be thought of as the topic of the conversation.
If a person (node) is interested in a topic, they can always join (subscribe) at any time or stop listening at any time if it's boring.
If they have something to say about a certain topic, they can speak (publish) freely.
ROS nodes can publish to many topics and listent to many at the same time.
This graph captures the essense of the ROS concept.
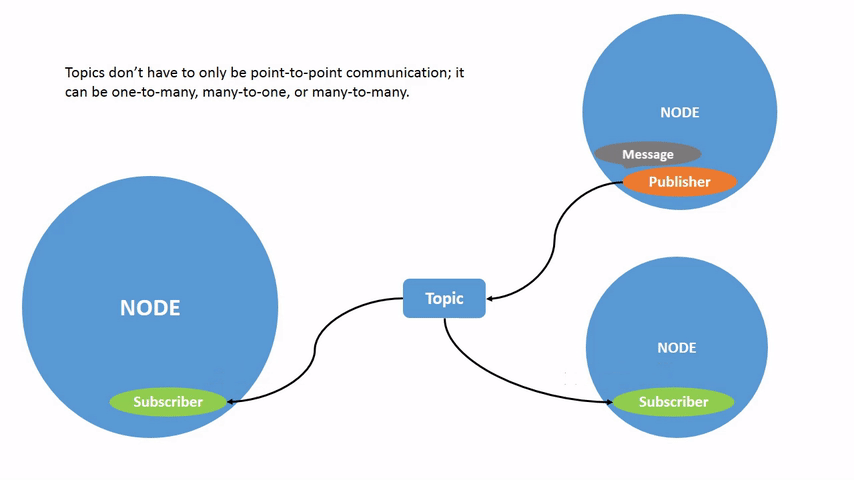 Picture source: https://docs.ros.org/en/humble/Tutorials/Beginner-CLI-Tools/Understanding-ROS2-Topics/Understanding-ROS2-Topics.html
To speak, a node needs a special type of function called a publisher.
In your workspace, create a file and name it hri_publisher.py in the following folder (mobilehri_ws/src/my_package/my_package/).
# In a terminal
cd ~/mobilehri_ws/src/my_package/my_package/
touch hri_publisher.py                        # This creates an empty file called hri_publisher.
You can create files using the code editor, which is similar to the VSCode interface. Your file structure should look like this now.
mobilehri_ws/
    src/
        my_package/
            my_package/          # Where your actual python code will live
                __init__.py
                hri_publisher.py     # NEW!
            package.xml          # Package info, can add more dependencies
            resource/            # autogenerated by python
            setup.cfg            # autogenerated to create executables
            setup.py             # can add entry_points (terminal shortcuts)
test/Let's make a talking node first! Open the file hri_publisher.py. Let's write this line by line.
First type in the following lines to import required packages:
import rclpy
from rclpy.node import Node
from std_msgs.msg import String
Recall that when we create the pacakge in Task 3, we add dependencies to rclpy and std_msgs. We are using them now! rclpy contains basic functionalities of ROS, and we specifically need the Node class from rclpy, which provides basic functions of nodes in ROS.
std_msgs is a package that contains many different types of messages. Click here to see a list of included message types.
Now, copy the following class to the hri_publisher.py.
class HRIPublisher(Node):

    def __init__(self):
        super().__init__('hri_publisher')
        self.publisher_ = self.create_publisher(String, 'hri_topic', 10)
        timer_period = 1  # seconds
        self.timer = self.create_timer(timer_period, self.timer_callback)
        self.i = 0

    def timer_callback(self):
        msg = String()
        msg.data = 'Hey robot, how are you doing? (%d)' % self.i
        self.publisher_.publish(msg)
        self.get_logger().info('Chatting with the robot: "%s"' % msg.data)
        self.i += 1
Let's decode this line by line.
# First, Let's create a node called `HRIPublisher`
class HRIPublisher(Node):
ROS 2 has a general template for how Node should operate. To create your own customized node, you need to make your class inherit the general Node class you just imported. If you are unfamiliar with the concept of inheritance, do a quick search online!
    # This function will be called whenever our Node is being created.
    def __init__(self):
        super().__init__('hri_publisher')
super() means this child class inherit all the methods and properties from its parent.Here, we ask our own HRIPublisher node to have all the basic functionalities of the rclpy.Node class, and give it a name called hri_publisher.
self.publisher_ = self.create_publisher(String, 'hri_topic', 10)Most important line of code! we are creating a publisher function using self.create_publisher() function.
It is saying that our HRIPublisher node is going to publish messages of the type String, under the topic name hri_topic. The number 10 is specifing something called a qos_profile (quality of service), which specifies the rules on how messages should be handled. Read more about it here. We will talk more about this later.
        timer_period = 1.0  # seconds
        self.timer = self.create_timer(timer_period, self.timer_callback)
ROS 2 node also provides you with a timer. What this means is that after every time_period (1 second here), the node will automatically call the function self.timer_callback. Let's look inside timer_callback().
    def timer_callback(self):
        msg = String()
Create a message with the type String.
msg.data = 'Hey robot, how are you doing? (%d)' % self.iFill in the message with some content. Note that your message content must match the message type. How to check? Look at the definition of String() class in ROS here. String message type in ROS contains a field called data, that is of type string. What? This is confusing. Let's look at another example.
In the future, you will encouter a message type called Point. Look at its definition here. It is saying that a Point message in ROS contains 3 pieces of information: x, y, z, and they must be floats. So, if you want to publish a Point, you need to define it as following:
pointMsg = Point()
pointMsg.x = 1.0
pointMsg.y = 0.0
pointMsg.z = 0.0 self.publisher_.publish(msg)We are using our defined publisher_ function to publish the msg! Our node will start talking!
self.get_logger().info('Chatting with the robot: "%s"' % msg.data)This is ROS's equivalent of print() in python, but a bit fancier. It will print extra information such as publishing time of the message.
self.i += 1Well, we all know what this means. Just increment this variable i by 1.
So, this timer callback function is just publishing one message. But because this function is called every 1 second, we are publishing a message every second!
Now, we define a main function to handle a few ROS related things and use our freshly defined hri_publisher class. This is very much a template that you can just reuse in the future.
Copy the code below to hri_publisher.py, following the class definition of HRIPublisher.
def main(args=None):
    rclpy.init(args=args)

    hri_publisher = HRIPublisher()

    rclpy.spin(hri_publisher)

    hri_publisher.destroy_node()
    rclpy.shutdown()


if __name__ == '__main__':
    main()
What your code should look like now.
import rclpy
from rclpy.node import Node

from std_msgs.msg import String

class HRIPublisher(Node):

    def __init__(self):
        super().__init__('hri_publisher')
        self.publisher_ = self.create_publisher(String, 'hri_topic', 10)
        timer_period = 1  # seconds
        self.timer = self.create_timer(timer_period, self.timer_callback)
        self.i = 0

    def timer_callback(self):
        msg = String()
        msg.data = 'Hey robot, how are you doing? (%d)' % self.i
        self.publisher_.publish(msg)
        self.get_logger().info('Chatting with the robot: "%s"' % msg.data)
        self.i += 1

def main(args=None):
    rclpy.init(args=args)

    hri_publisher = HRIPublisher()

    rclpy.spin(hri_publisher)

    hri_publisher.destroy_node()
    rclpy.shutdown()


if __name__ == '__main__':
    main()
Let's take a close look at this as well.
def main(args=None):
    rclpy.init(args=args)
Initialize the rclpy library.
hri_publisher = HRIPublisher()Use our freshly defined class to create a node
rclpy.spin(hri_publisher)The spin() function spins the node. After a node is created, items of work can be done (e.g. subscription callbacks) by spinning on the node.
This is mostly relevant to our callback function. Remember we have a timer callback function? This will make sure it will be called properly.
    hri_publisher.destroy_node()
    rclpy.shutdown()
Handle shutdown gracefully.
if __name__ == '__main__':
    main()
We just defined a few functions and classes, but none of them are called yet. Here we called the main() function we just wrote.
Give it a try!
cd ~/mobilehri_ws/src/my_package/my_package/
python3 hri_publisher.py
You should see something like the following.
[INFO] [1674735935.818313147] [hri_publisher]: Chatting with the robot: "Hey robot, how are you doing? (0)"
[INFO] [1674735936.798105448] [hri_publisher]: Chatting with the robot: "Hey robot, how are you doing? (1)"
[INFO] [1674735937.798246922] [hri_publisher]: Chatting with the robot: "Hey robot, how are you doing? (2)"
[INFO] [1674735938.798238691] [hri_publisher]: Chatting with the robot: "Hey robot, how are you doing? (3)"
[INFO] [1674735939.798006037] [hri_publisher]: Chatting with the robot: "Hey robot, how are you doing? (4)"
Note that this is not what is delivered to the topic. This is just what we printed to the terminal with get_logger().
ROS provides you with a set of command line tools that help you inspect the nodes and topics. Let's try them! Leave the previous terminal running, and open a new terminal.
ros2 node listSee our /hri_publisher node here?
ros2 topic listThis gives you the following.
/hri_topic            # Ours!
/parameter_events     # always there
/rosout               # always there
To see what is being published under /hri_topic
ros2 topic echo /hri_topicThis will prints out what is actually being published by our node!
- Note that our node is alone in the network now! It is talking but no one is listening. That's right, nodes don't need a listener in order to speak.
To close the program, click the terminal that is running, and press Ctrl + C, control + C on mac.
Okay, now we have a talkative node that is constantly greeting a robot, but it is alone in the network. Let's make it a friend that listens to it.
In your workspace, create a file and name it hri_subscriber.py in the following folder (mobilehri_ws/src/my_package/my_package/).
# In a terminal
cd ~/mobilehri_ws/src/my_package/my_package/
touch hri_subscriber.py
Your file structure should look like this now.
mobilehri_ws/
    src/
        my_package/
            my_package/
                __init__.py
                hri_publisher.py
                hri_subscriber.py # New!
            package.xml
            resource/
            setup.cfg
            setup.py
            test/
Copy paste the following code to hri_subscriber.py. Save your file.
import rclpy
from rclpy.node import Node
from std_msgs.msg import String


class HRISubscriber(Node):

    def __init__(self):
        super().__init__('hri_subscriber')
        self.subscription = self.create_subscription(String, 'hri_topic', self.listener_callback, 10)

    def listener_callback(self, msg):
        self.get_logger().info('I heard: "%s"' % msg.data)
        self.get_logger().info("I am not doing so well. I failed my Turing test. ")


def main(args=None):
    rclpy.init(args=args)
    hri_subscriber = HRISubscriber()
    rclpy.spin(hri_subscriber)
    hri_subscriber.destroy_node()
    rclpy.shutdown()


if __name__ == '__main__':
    main()
As you can see, the structure is the same (Because it is also just a node).
self.subscription = self.create_subscription(String, 'hri_topic', self.listener_callback, 10)This time, we are creating a subscriber.
create_subscription(msg_type, topic, callback, qos_profile)
The first parameter defines message type. This parameter must match with the message type of the topic, otherwise they are not speaking the same language!
The second parameter is the topic name. This is the topic you want to listen to.
Like the timer we encountered in the publisher section, subscribers also have callback functions (here, it is named self.listener_callback). What's different is that the timer callback will be called with predefined frequency, and subscriber callbacks will be called every time it receives a new message from subscribed topic.
Let's try it!
If you shutdown the publisher, restart it.
# In terminal 1
cd ~/mobilehri_ws/src/my_package/my_package/
python3 hri_publisher.py
# In terminal 2
cd ~/mobilehri_ws/src/my_package/my_package/
python3 hri_subscriber.pyIn terminal 2, you should see that whenever a message is published in terminal 1, the subscriber will respond to it!
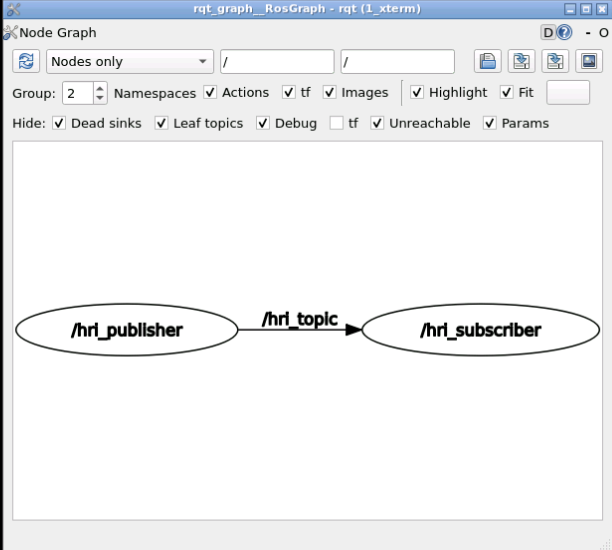
ROS also offers a debugging tool for you to visualize your ROS graph.
# Open another terminal, leave terminal 1 and 2 running.
rqt_graph
You should be able to see both of your nodes connected through the topic.
- Link to the folder of a ROS package that contains a publisher and a subscriber
- List 5 questions you have about ROS following the tutorial, answers you have found and things you still don't get
- Feedback on the bootcamp: What was easy and what was difficult to understand?