👍🥳 First off, thanks for taking the time to contribute! 🥳👍
The following is a set of guidelines for contributing to the website repository, which is hosted on GitHub. These are mostly guidelines, not rules. Use your best judgment, and feel free to propose changes to this document in the form of a pull request.
The guide below assumes that you have completed the onboarding process which includes joining the Hack for LA Slack, GitHub, and Google Drive. If you have not been onboarded, please refer to the Getting Started Page.
If you need a text editor to work on code, VS Code is recommended by the team, but feel free to use a text editor of your choice.
If you have any other questions about your contributing process, feel free to reach out to the team in the #hfla-site Slack channel.
- How to Contribute to Hack for LA
- Table of Contents
- Part 1: Setting up the development environment
- 1.1 Dev setup (1): Join the repository team
- 1.2 Dev setup (2): Installing Git
- 1.3 Dev setup (3): Fork the repository
- 1.4 Dev setup (4): Clone (Create) a copy on your computer
- 1.5 Dev setup (5): Set up Docker
- 1.6 Dev setup (6): Build and serve the website locally
- 1.7 Dev setup (7): Install local codebase spell checker
- Part 2: How the Website team works with GitHub issues
- 2.1 Hack for LA Contributor expectations
- 2.2 How Hack for LA organizes issues
- 2.3 Where can I find GitHub issues to work on?
- 2.4 Claiming an Issue
- 2.5 Reporting progress on your issue
- 2.6 What to do when you need to stop mid issue
- 2.7 Working on an issue
- 2.7.a Working on an issue (1): Verify current branch is
gh-pages - 2.7.b Working on an issue (2): Creating your issue branch and testing your code changes
- 2.7.c Working on an issue(3): Prepare your changes to push to your repository
- i. Prepare repo changes (1): Use the
git addcommand to stage your changes. - ii. Prepare repos changes (2): Use the
git statuscommand to see what files are staged. - iii. Prepare repos changes (3): Use the
git reset HEADcommand to remove a staged file. - iv. Prepare repos changes (4): Use the
git commitcommand
- i. Prepare repo changes (1): Use the
- 2.7.d Working on an issue (4): Pulling from upstream before you push
- 2.7.e Working on an issue (5): Incorporating changes from upstream
- 2.7.f Working on an issue (6): Handling SSH authorization errors
- 2.7.a Working on an issue (1): Verify current branch is
- Part 3: Pull Requests
- 3.1 How to make a pull request
- 3.1.a Push all changes to your issue branch
- 3.1.b Complete pull request on Hack for LA
websiterepo- i. Complete pull request (1): Update pull request title
- ii. Complete pull request (2): Add issue number to the pull request
- iii. Complete pull request (3): Explain the changes you made, then explain why these changes were needed
- iv. Complete pull request (4): Include images (if available)
- v. Complete pull request (5): How to add a pull request to the project board
- vi. After pull request is submitted/merged
- 3.1.c Editing a submitted pull request
- 3.1.d Dealing with merge conflicts
- 3.1 How to make a pull request
- Part 4: Resources and Documentation
In the hfla-site Slack channel, send an introductory message with your GitHub handle/username asking to be added to the Hack for LA website GitHub repository (this repository).
NOTE: Once you have accepted the GitHub invite (comes via email or in your GitHub notifications), please do the following:
- Make your own Hack for LA GitHub organization membership public by following this guide.
- Set up two-factor authentication on your account by following this guide.
Before cloning your forked repository to your local machine, you must have Git installed. You can find instructions for installing Git for your operating system here. Please note that if you have a Mac the page offers several options (see other option, if you need to conserve hard drive space) including:
- an “easiest” option (this version is fine for use at hackforla): This option would take just over 4GB.
- a “more up to date” option (not required but optional if you want it): This option prompts you to go to install an 8GB package manager called Homebrew.
- Other option: If your computer is low on space, you can use this tutorial to install XCode Command Tools and a lighter version of Homebrew and then install Git using this command:
$ brew install gitwhich in total only uses 300MB.
You can fork the hackforla/website repository by clicking  Fork
. A fork is a copy of the repository that will be placed on your GitHub account.
Fork
. A fork is a copy of the repository that will be placed on your GitHub account.
Click here to see a visual example of the `fork` button within the website repo
First, you find the `fork` button on the top right hand side of the [Hack for LA website repo](https://github.com/hackforla/website)

Next, a modal may open and request where you want to fork this website repo. Please click on your avatar or your GitHub username

Note: It should create a URL that looks like the following -> https://github.com/<your_GitHub_user_name>/website.
For example -> https://github.com/octocat/website.
Be Aware: What you have created is a forked copy in a remote version on GitHub. It is not yet on your local machine yet.
Before creating a copy to your local machine, you must have Git installed. You can find instructions for installing Git for your operating system here.
The following steps will clone (create) a local copy of the forked repository on your computer.
Create a new folder in your computer that will contain hackforla projects.
In your command line interface (Terminal, Git Bash, Powershell), move to where you want your new folder to be placed and create a new folder in your computer that will contain hackforla projects. After that, navigate into the folder(directory) you just created.
For example:
mkdir hackforla
cd hackforla
and run the following commands:
git clone https://github.com/<your_GitHub_user_name>/website.gitFor example if your GitHub username was octocat:
git clone https://github.com/octocat/website.gitYou should now have a new folder in your hackforla folder called website. Verify this by changing into the new directory:
cd websiteVerify that your local cloned repository is pointing to the correct origin URL (that is, the forked repo on your own GitHub account):
git remote -vYou should see fetch and push URLs with links to your forked repository under your account (i.e. https://github.com/<your_GitHub_user_name>/website.git). You are all set to make working changes to the website on your local machine.
However, we still need a way to keep our local repo up to date with the deployed website. To do so, you must add an upstream remote to incorporate changes made while you are working on your local repo. Run the following to add an upstream remote URL & update your local repo with recent changes to the hackforla version:
git remote add upstream https://github.com/hackforla/website.git
git fetch upstream
After adding the upstream remote, you should now see it if you again run git remote -v :
origin  https://github.com/<your_GitHub_user_name>/website.git (fetch)
origin  https://github.com/<your_GitHub_user_name>/website.git (push)
upstream        https://github.com/hackforla/website.git (fetch)
upstream        https://github.com/hackforla/website.git (push)
1.4.c What if you accidentally cloned using the repository URL from the HackForLA GitHub (instead of the fork on your GitHub)?
Set your forked repo on your GitHub as an origin remote:
git remote set-url origin https://github.com/<your_GitHub_user_name>/website.gitFor example if your GitHub username was octocat:
git remote set-url origin https://github.com/octocat/website.gitAdd another remote called upstream that points to the hackforla version of the repository. This will allow you to incorporate changes later:
git remote add upstream https://github.com/hackforla/website.gitDocker is the recommended approach to quickly getting started with local development. Docker helps create a local/offline version of the hackforla.org website on your computer so you can test out your code before submitting a pull request.
The recommended installation method for your operating system can be found here. Feel free to reach out in the Hack for LA Slack channel if you have trouble installing docker on your system
More on using Docker and the concepts of containerization:
If you are on Windows and get 'You are not allowed to use Docker, you must be in the "docker-users" group' as an error message, the following wiki page is a guide for solving the issue:
Installing WSL2 on windows
If you are using Windows Subsystem for Linux (WSL) and finding a permission error when running docker compose up, the issue might be caused by a version of Docker that relies on a buggy version of Go. In your terminal, run docker version to see which Go version: is listed. Any version less than go1.20.0 has a problem and indicates that your Docker needs to be updated.
IMPORTANT: Please make sure the Docker Desktop application is running on your computer before you run the bash commands below.
- This command starts a jekyll server locally. The server watches for changes to the source files and rebuilds and refreshes the site automatically in your browser.
Navigate to within the website directory that you cloned earlier in your terminal then run the below command
docker compose upRunning the above command will result in the following output in your terminal
Click here to see an example terminal output
Starting hfla_site ... done
Attaching to hfla_site
hfla_site    | ruby 2.7.1p83 (2020-03-31 revision a0c7c23c9c) [x86_64-linux-musl]
hfla_site    | Configuration file: _config.yml
hfla_site    | Configuration file: _config.docker.yml
hfla_site    |             Source: .
hfla_site    |        Destination: /srv/jekyll/_site
hfla_site    |  Incremental build: enabled
hfla_site    |       Generating...
hfla_site    |                     done in 33.641 seconds.
hfla_site    |                     Auto-regeneration may not work on some Windows versions.
hfla_site    |                     Please see: https://github.com/Microsoft/BashOnWindows/issues/216
hfla_site    |                     If it does not work, please upgrade Bash on Windows or run Jekyll with --no-watch.
hfla_site    |  Auto-regeneration: enabled for '.'
hfla_site    | LiveReload address: http://0.0.0.0:35729
hfla_site    |     Server address: http://0.0.0.0:4000/
hfla_site    |   Server running... press ctrl-c to stop.
When you see the above output, it means the site is now running and now you can browse to http://localhost:4000
- To stop and completely remove the jekyll server (i.e. the running Docker container):
(do this anytime Docker or jekyll configuration or other repository settings change)
docker compose downTo stop the server, but not destroy it (often sufficient for day-to-day work):
docker compose stopBring the same server back up later with:
docker compose upYou must use VS Code as your local text editor to install the VS Code extension for spell checking your codebase, Code Spell Checker.
The recommended installation method is to install Code Spell Checker directly from the VS Code text editor, and those instructions can be found here. The extension can also be installed via the VS Code Marketplace website here.
For developers who do not use VS Code, use the corresponding npm package, cspell, and those instructions can be found here.
Feel free to reach out in the Hack for LA Slack channel if you have trouble installing the VS Code extension or the cspell npm package on your system.
In order to work on a Complexity: Small/Complexity: Medium/Complexity: Large label issue within this repo, you need to complete the following:
good first issue- Self-assign an issue with the
good first issuelabel. - Complete steps in 2.7 Working on an issue to create a solution for the issue
- Complete steps in 3.1 How to make a pull request to get your solution reviewed by the
website-mergeteam. - Once your pull request is merged, you can work on your next issue.
- Self-assign an issue with the
- Repeat #1 with a new
good first issue
Progress through issues with increasing complexity in the following order:
- Good first issue (x2)
- Small
- Medium
- Large
- Extra Large
The reasons for this progression are:
- The issues start out as being prescriptive and become less so as you gain more experience by working through increasingly complex issues.
- We are trying to teach you the team methodology through the issues themselves.
- It ensures you understand what we expect and the quality of contributions.
All website team members are required to attend at least 1 team meeting in a week (held on Tuesdays, Thursdays and Sundays). In case, you are unable in any given week, you should reach out to the tech leadership team. Exceptions to this requirement may be provided on a case-by-case basis.
All website team members are expected to devote a minimum of 6 hours per week while working on various assignments during their entire tenure at the website team (excluding week offs and vacations).
Also, please let the tech leadership team know (through a Slack message in the hfla-site channel as well as an @ mention in a comment of the issue that you would be working on) if you are planning to take a week off or a longer vacation.
Prior to joining another project within Hack for LA, developers should gain the following experience:
- Setting up your local environment from a CONTRIBUTING file
- Completing the above series of issues at least up to
Complexity: Large - Resolving Merge Conflicts
- Reviewing other people's Pull Requests
- Create or improve documentation for other developers
- Mentor other developers
- Create new issues
In addition, backend engineers should complete issues that provide experience with the following:
- API requests
- Cron Job Scripting
- CRUD operations
We currently have issues with the following role labels:
role: front endrole: backend/devOps
And the following complexity labels:
good first issuecomplexity: Smallcomplexity: Mediumcomplexity: Large
Note: The Prioritized Backlog column is filtered so the first (top) issue has the highest priority and should be worked on next.
Note: if you would like to learn more about our label system you can read this wiki on how to read and interpret our repo labels
The best way to view the issues available is our GitHub Project Board
For the purpose of finding issues to work on, developers should focus exclusively on the Prioritized Backlog column, which contains all the available issues that have been approved and prioritized.
Note: The column is filtered so the first (top) issue has the highest priority and should be worked on next.
Use the link good first issues to display "good first issues" (for both front end and back end roles) in the Prioritized Backlog column.
Note: The column is filtered so the first (top) issue has the highest priority and should be worked on next.
Prioritized Backlogcolumn in the filtered Project Board - complexity: Small labelPrioritized Backlogcolumn in the filtered Project Board - complexity: Medium labelPrioritized Backlogcolumn in the filtered Project Board - complexity: Large and XLarge label
Please use the Prioritized Backlog column in the filtered Project Board - Hacktoberfest label
Note: You can only submit a pull request for one (1) issue with the Hacktoberfest label. Also leave a comment within the issue you would like to work on.
Note: If you would like to continue to contribute please join our team. You can find more information on our Hack for LA Getting Started Page.
If you see any bugs/errors within the site and there is not an issue for it, please reach out to any of the Website leadership/merge team and they will help you create an issue you can resolve.
Once you find an issue you want to work on, you need to self-assign to claim it and then move the issue from the Prioritized Backlog to the In progress. Both of these tasks can be accomplished within the issue. Please see the examples below. (Note: Any issue that you are working on besides the pre-work issue should remain in the In progress column and stay open. Once a member of the merge team or a tech lead merges your pull request associated with that issue, there is automation through GitHub Actions that will take care of moving the issue to a different column and closing the issue.)
Click here to see how you assign & unassign yourself to an issue
Assign/Unassign demo

- Go to the issue you want to work on
- Go to the right hand menu under
Assignees- Click the
assign yourselflink
- Click the
- Go to the issue you are assigned to
- Go to the right hand menu and click on the gear wheel (:gear:) to the right of
Assignees- Click on the
X clear assigneeslink
- Click on the
Click here to see how to move an issue from the ‘Prioritized Backlog’ to the ‘In progress (actively working)’ & back
Project Board column demo
- Click on the dropdown menu within the
Projectssection of the right-hand menu (value will showPrioritized Backlogif unclaimed)- Select
In progress (actively working)
- Select
- Click on the dropdown menu within the
Projectssection of the right-hand menu (value will showIn progress (actively working)if unclaimed)- Select
Prioritized Backlog
- Select
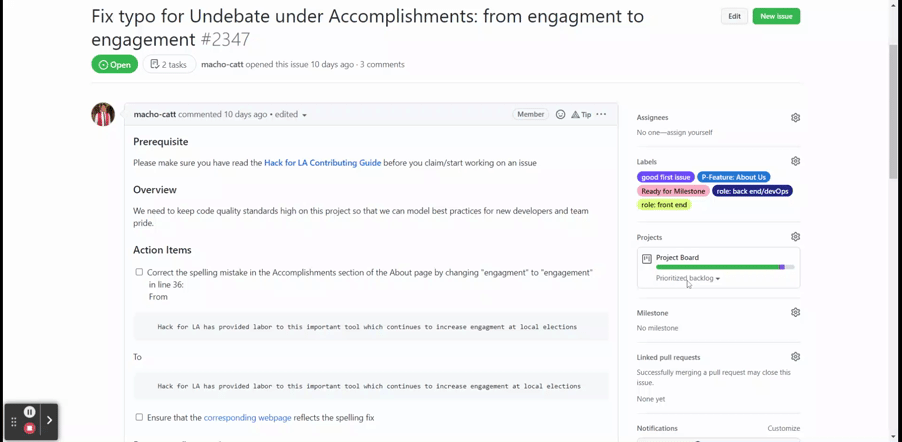
- Be sure to check the box when you finish an action item.
- Report your progress weekly in a comment below using the following format:
Progress: "What is the current status of your project? What have you completed and what is left to do?"Blockers: "Difficulties or errors encountered."Availability: "How much time will you have this week to work on this issue?"ETA: "When do you expect this issue to be completed?"Pictures(optional): "Add any pictures of the visual changes made to the site so far."
Note: We currently have a GitHub action action that requests an update via a comment after 7 days of inactivity within an issue. Please be sure to provide weekly updates on progress and/or blockers so we can help you resolve them.
Note: If you would like to know more about how we provide updates within the website team, please read this wiki on how to communicate with our website team
- Got personally busy, can’t finish
- Only want to do a specific type of front end or back end task
- There is a blocker in the way of finishing and you would like the opportunity to work on other issues
- For your issue, uncheck the checkboxes for any action items that have to be redone by the next developer picking up the issue.
- Add a note in the comments with details and progress for the next developer
- Move this issue from the ‘In progress’ to the ‘Prioritized Backlog’(see - project board column example above)
- Unassign yourself from this issue (see the unassign example above)
- If you are using Visual studios code you can use the Git graphical user interface to stage your changes. For instructions check out the Git gui wiki
Note: Alternatively you can follow the instructions below to stage changes through the terminal. We will be using Update ‘Give’ image credit link and information - #2093 as an example issue we will be following.
Create a new branch for each issue you work on. Doing all your work on topic branches leaves your repository's main branch (named gh-pages) unmodified and greatly simplifies keeping your fork in sync with the main project.
The git branch command will let you know what branch you are in, and what branch names are already in use.
git branchYou will see a list of all of your branches. There will be a star (*) next to the branch that you are currently in. By default you should start on the gh-pages branch.
Note: When you work on future issues, you must always be in the gh-pages branch when creating a new branch.
If you are not currently in the gh-pages branch, run the following command to return to it:
git checkout gh-pagesUpdate your gh-pages branch with upstream changes:
git pull upstream gh-pagesIf you have not already done so, run git checkout gh-pages to switch the working directory to the gh-pages branch and then update gh-pages with upstream changes as described above in Section 2.7.a.
Using the -b flag you can also use the git checkout command to create a new branch and immediately switch into it.
For example, if you create a new issue branch for Update ‘Give’ image credit link and information - #2093:
git checkout -b update-give-link-2093The text after the -b, in the example update-give-link-2093, will be the name of your new branch.
Note: Choose a branch name that:
- relates to the issue (No spaces!)
- includes the issue number
Note: The format should look like the scheme above where the words are a brief description of the issue that will make sense at a glance to someone unfamiliar with the issue.
Note: No law of physics will break if you don't adhere to this scheme, but laws of git will break if you add spaces.
We urge developers to be cautious using git add. In general it is not advisable to use git add -all or git add .. Rather, run git status, examine the output carefully, and then add only those files specifically related to the current issue. This will ensure that no extraneous files are included in the subsequent commit.
When you've finished working on your issue, follow the steps below to prepare your changes to push to your repository.
- Importance of testing
-
Testing is a fundamental step to ensure quality of code and that code changes are functioning as expected. We don't want to debug or find solutions for features while the code is already in a production environment in real time. For some it's not the most engaging step and skip it, others simply have not done it before, and some may see it as unecessary time consuming step. The reasoning behind testing is that we'll be able to quickly identify bugs more easily and save time in the future instead of creating future time debt to debug. Fixing easily preventable bugs is the idea and testing gives us a tool to come up with new solutions and improve our code. Testing a pull request for frontend
-
Here are some additional links for backend/DevOps testing:
HfLA Github Actions
Creating your own project board
Using your own personal access token to test in your own project board -
Make sure to comment on your issue if you aren't sure how to test something, and then to put it in the Questions / In Review column and add the
ready for dev leadlabel. Paste a link to your comments in the #hfla-site Slack channel asking peers for help.
- A few notes regarding Docker:
-
To test your issue branch locally, run the command "docker compose up" from a terminal window. The website will then be accessible at http://localhost:4000.
-
The Docker Desktop application must be running, otherwise
docker compose upwill not work -
Docker pulls an image from Dockerhub.com which enables Docker to build the website locally with the same environment used to build the site at GitHub. As the environment and dependencies change, HfLA engineers update the Dockerhub image; however, the image updated at Dockerhub is not automatically downloaded, so it is necessary to periodically check to determine if the local image is outdated, and if so, to pull the updates from Dockerhub. Use this process:
-
In the Docker Desktop application, from the
Imagespage, click the Action menu (3 dots) for the imagehackforlaops/ghpages, select optionView details.- In the new Docker Desktop application, select option
View packages and CVEsinstead.
Click here to see how to view details for a Docker image


- In the new Docker Desktop application, select option
-
Note the
CREATEDcolumnClick here to see how to determine when an image was last updated in Docker Desktop

-
View the details of the "latest" tag from hackforlaops Dockerhub image tags and determine when an image was pushed to Docker hub
Click here to see how to determine when an image was pushed to Docker hub

-
If the "latest" tagged image at Docker hub is more recent than the image in Docker Desktop, use the Docker Desktop Action menu (3 dots) to "pull" down the updated image
Click here to see how to pull image from DockerHub

-
Note that the next
docker compose upwill take extra time to recreate the Docker container based on the updated image. -
If the above steps did not resolve your issue, run through the first three steps again, but try resetting your browser's cache before restarting docker (you can also try running http://localhost:4000 in another browser).
-
If you still do not see your changes after trying these steps, please feel free to reach out to the team in the #hfla-site Slack channel, or bring up your issue in a dev meeting.
Once you are done with the work on your issue you will push it to your repository. Before you can push your work to your repository, you will stage and commit your changes. These two commands are similar to the save command that you have used to in other programs.
Note: If you are using Visual studios code you can use the Git graphical user interface to stage your changes. For instructions check out the Git Gui Wiki
This command prepares your changes before you commit them. You can stage files one at a time using the filename.
Run this command if you want to add changes from a specific file(s) to your commit record:
git add “filename.ext”Run this command if you want to add all changes to all file(s) to your commit record:
git add .This command will list the files that have been staged. These are the files that will be committed (saved) when you run the next command, git commit. Please be sure all your staged changes are relevant to the issue you are working on. If you accidentally included unrelated changes, please unstage them before making this commit, and then make a new commit for the unrelated changes. (The commands for unstaging commits are provided in the output of your git status command.)
git statusThis command will remove a file that has been staged. This file will not be committed (saved) when you run the next command, git commit. This only works if the wrong files were added, but they were not yet committed. The file will be removed from the staging area, but not actually deleted:
git reset HEAD “filename.ext”This command saves your work, and prepares it to push to your repository. Use the -m flag to quickly add a message to your commit. Your message should be a short description of the issue you are working. It will be extremely helpful if other people can understand your message, so try to resist the temptation to be overly cryptic.
To commit your changes with a message, run:
git commit -m “insert message here”- If you do not see the changes you applied when you run
docker compose up, delete_sitedirectory and.jekyll-metadatafile and restart docker. This will force docker to rebuild the whole site.
IMPORTANT: Before you push your local commits to your repository, sync your fork to the main Hack For LA website repository. You can sync your fork directly on GitHub by clicking "Sync Fork" at the right of the screen and then clicking "Update Branch":
Click here to see how to sync the fork on GitHub
Next, bring upstream changes into your topic branch. With your topic branch checked out, run:
git pull upstream gh-pagesIf you pulled the upstream repository and there have not been any changes in the main Hack for LA website repository since you last pulled, you may get an output like this:
 * branch              gh-pages   -> FETCH_HEAD
Already up to date.
This means it is safe to push your local commits to your fork. Note: Depending on your git settings, you may need to write a commit message to merge the changes that were pulled into your local branch.
If you just type git push you will be prompted to create a new branch in your GitHub repository. The more complete command below will create a new branch on your copy of the website repository, and then push your local branch there. The name at the end of this command should be the same as the name of the local branch that you created back in step 3, as in the example below:
git push --set-upstream origin update-give-link-2093This section shows you alternative methods to sync your fork with the main Hack for LA website repository. The recommended method for syncing your fork is through the GitHub browser as detailed in section 2.7.d
One way to keep your fork up to date with this repository is to follow these instruction: Syncing your fork to the original repository via the browser
You can also update your fork via the local clone of your fork, using these instructions. Assuming you have a local clone with remotes upstream (this repo) and origin (your GitHub fork of this repo):
- First, you will need to create a local branch which tracks upstream/gh-pages. You will only need to do this once; you do not need to do this every time you want to incorporate upstream changes.
Run the following two commands:
git fetch upstream
git checkout -b upstream-gh-pages --track upstream/gh-pages
If you have already created the branch upstream-gh-pages, the following commands will incorporate upstream changes:
- Move to the branch you want to merge with.
git checkout upstream-gh-pages - Update your tracking branch with the latest changes from the
gh-pagesbranch in this repository
git pull - Move back to your gh-pages branch
git checkout gh-pages - Merge your changes back into your
gh-pagesbranch.
git merge upstream-gh-pagesIf you do all your work on topic branches (as suggested above) and keep gh-pages free of local modifications, this merge should apply cleanly.
Then push the merge changes to your GitHub fork:
git pushIf you go to your online GitHub repository this should remove the message "This branch is x commit behind hackforla:gh-pages".
To incorporate these updates from the main GitHub repository into your topic branch, you can 'rebase' your branch onto your updated gh-pages branch. NOTE you should only rebase if you have never pushed your topic branch to GitHub (or shared it with another collaborator).
We prefer rebase because it keeps the commit history clean and linear. If rebasing fails or becomes complex, use merge, which preserves branch history but may add additional merge commits.
git checkout update-give-link-2093
git rebase gh-pages
If you receive warnings about conflicts, abort the rebase with git rebase --abort and instead merge gh-pages into your branch.
git checkout update-give-link-2093
git merge gh-pagesIf you already have an SSH key that connects your computer with your GitHub account, you can skip this section (2.7.f).
IMPORTANT: If you are a Windows user then you have to install Git Bash, but if you are a Mac user you only need to use your terminal. Download Git Bash for Windows here: Git Bash
- You have to set up SSH keys in order to contribute to GitHub remotely. First check if you have any keys set up already.
ls -al ~/.sshIf the folder ~/.ssh does not exist, create it using
mkdir ~/.ssh- Then enter the text below into your terminal using your GitHub account email address.
ssh-keygen -t rsa -b 4096 -C "your_email@example.com"- You will be asked to enter a file to save the key, press enter, and then enter a passphrase. Then you will need to ensure that your machine and your repository are connected by running the ssh agent.
eval "$(ssh-agent -s)"- Next you need to add your ssh key to your ssh agent. In the command below, replace
id_ed25519with the filename (without file extension) you provided in the previous step.
ssh-add -K ~/.ssh/id_ed25519- Finally copy the ssh key to add it to your GitHub account by entering the following command. This copies the contents of the id_ed25519.pub file to your clipboard Don't copy anything else until after you finish the last step, or else you will have to repeat this step.
pbcopy < ~/.ssh/id_ed25519.pub- Go to your GitHub account's ssh key settings, and click on the button that says New SSH key. In the "Title" field, add a descriptive label for the new key. Paste the key into the form that pops up. Click Add SSH Key
- You have to set up SSH keys in order to contribute to GitHub remotely. First check if you have any keys set up already. Open Git Bash and run:
ls -al ~/.sshIf the folder ~/.ssh does not exist, create it using
mkdir ~/.ssh- Then enter the text below into your terminal using your GitHub account email address.
ssh-keygen -t rsa -b 4096 -C "your_email@example.com"- You will be asked to enter a file to save the key, press enter, and then enter a passphrase. Then you will need to ensure that your machine and your repository are connected by running the ssh agent.
eval "$(ssh-agent -s)"- Next you need to add your ssh key to your ssh agent. In the command below, replace
id_ed25519with the filename (without file extension) you provided in the previous step.
ssh-add ~/.ssh/id_ed25519- Finally copy the ssh key to add it to your GitHub account by entering the following command. This copies the contents of the id_ed25519.pub file to your clipboard Don't copy anything else until after you finish the last step, or else you will have to repeat this step.
clip < ~/.ssh/id_ed25519.pub- Go to your GitHub account's ssh key settings, and click on the button that says New SSH key. In the "Title" field, add a descriptive label for the new key. Paste the key into the form that pops up. Click Add SSH Key
Once you are satisfied with your changes, push them to the feature branch you made within your remote repository.
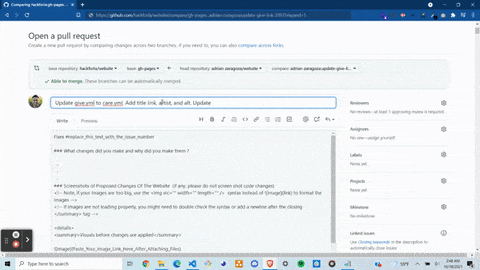
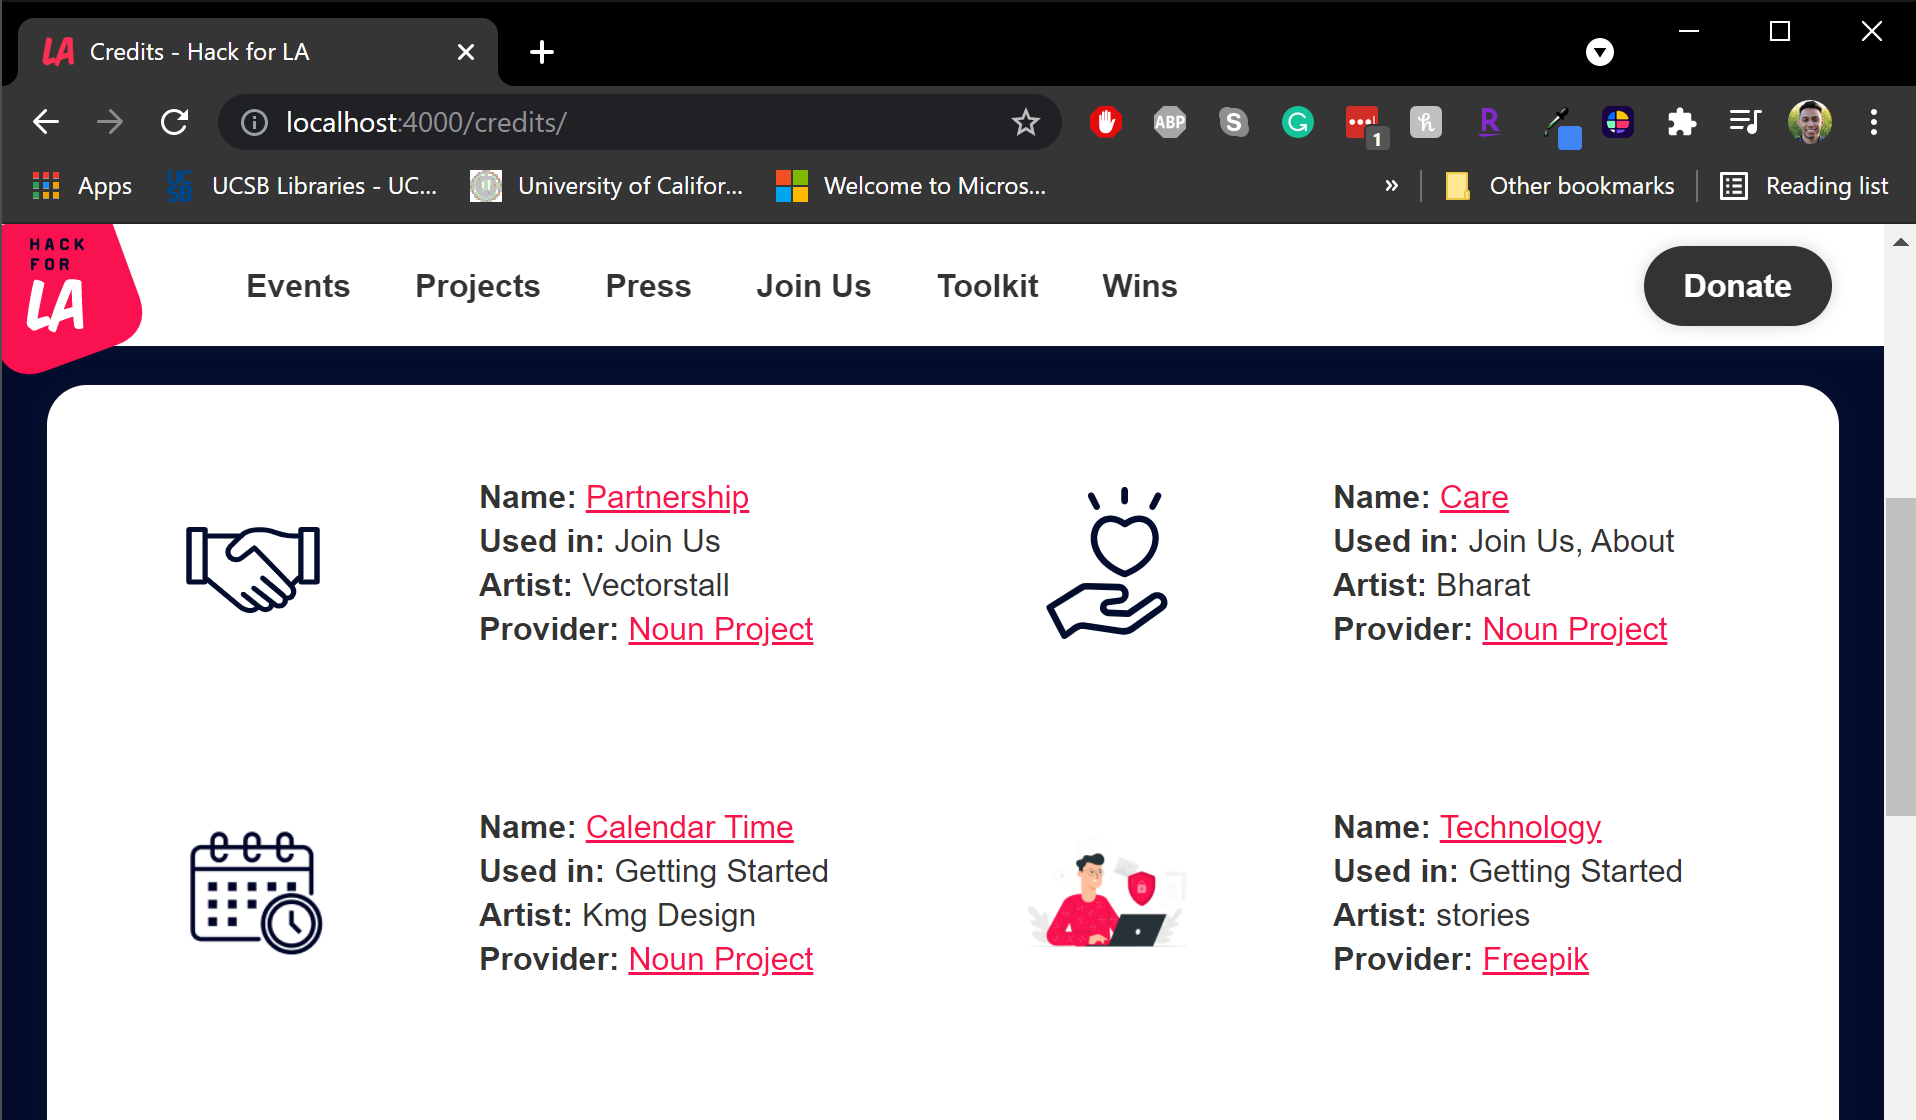
git push --set-upstream origin update-give-link-2093Note: We will use the pull request Update Care Link in Credits Page - #2131 as an example. This is tied to issue Update ‘Give’ image credit link and information - #2093
Click here to see a notification for a pull request

Click here to see pull request markdown template
<!-- Important! Add the number of the issue you worked on -->
Fixes #replace_this_text_with_the_issue_number
### What changes did you make?
<!-- Note: add lines if needed, and remove any unused lines -->
-
-
-
### Why did you make the changes (we will use this info to test)?
<!-- Note: add lines if needed, and remove any unused lines -->
-
-
-
### Screenshots of Proposed Changes To The Website (if any, please do not include screenshots of code changes)
<!-- Notes:
- If there are no visual changes to the website, delete all of the script below and replace with "- No visual changes to the website"
- If there are visual changes to the website, include the 'before' and 'after' screenshots below.
- If your images are too big, use the <img src="" width="" length=""> syntax instead of  to format the images
- If images are not loading properly, you might need to double check the syntax or add a newline after the closing </summary> tag
-->
<details>
<summary>Visuals before changes are applied</summary>

</details>
<details>
<summary>Visuals after changes are applied</summary>

</details>
Click here to see pull request #2131 example (gif)
- When the pull request is opened, the cursor will be located in the title input box, and the default title will be your last commit message from your branch.
- Change the title to a short summary of what you did on the issue:
-
Advice: Provide a 4-12 word description of your resolution to the issue
-
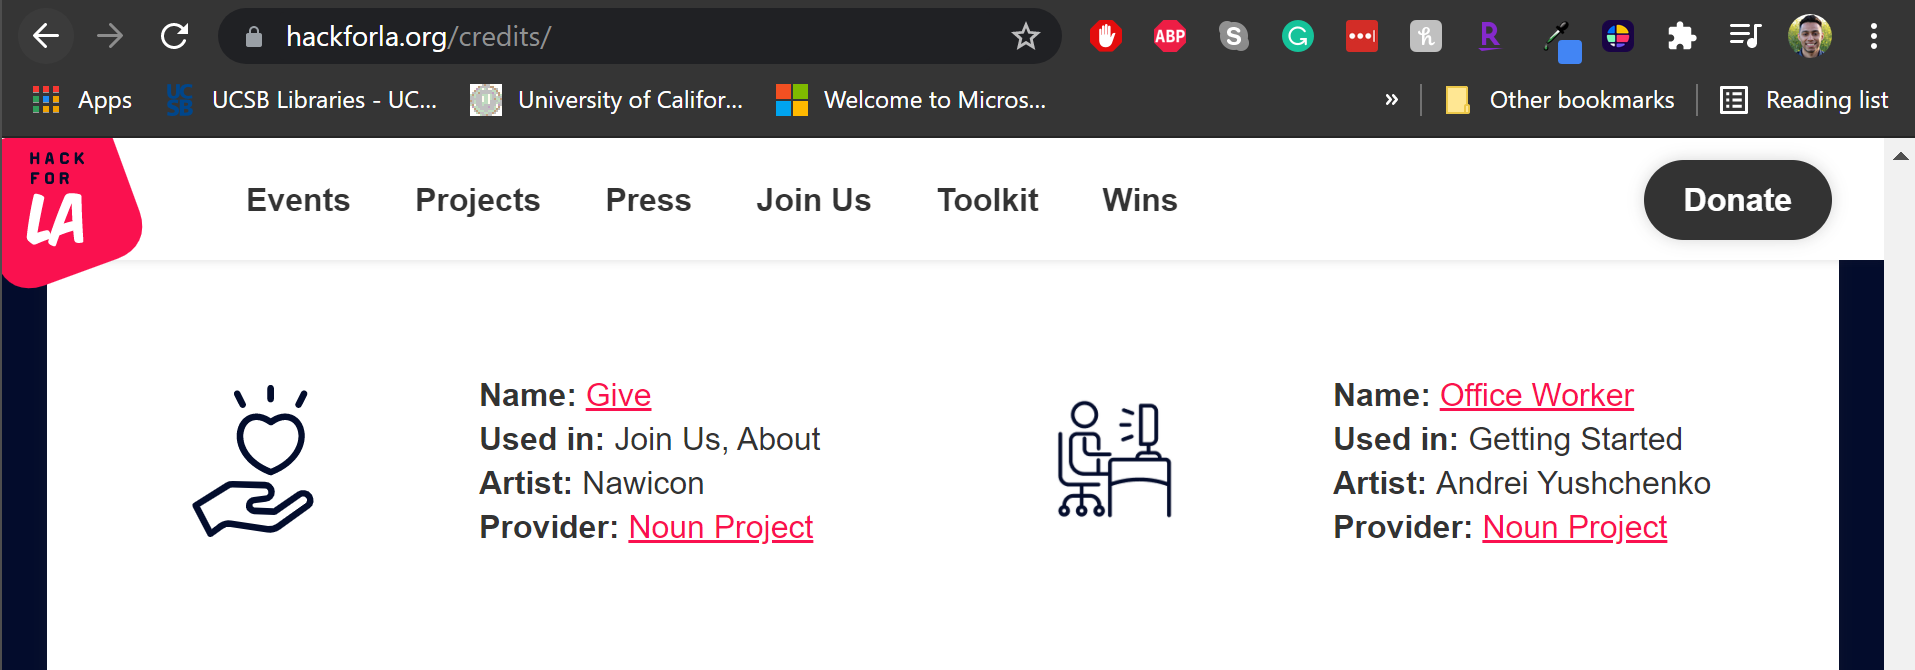
For our example, @adrian-zaragoza provided the following title:
Update Care Link in Credits Page -
Note: Upon creation, the pull request number will be appended to the title automatically. To avoid confusion, please do not include the issue number in the title.
-
The final title from our example is:
Update Care Link in Credits Page #2131
-
We have a GitHub action that automatically closes all issues connected to a pull request. So for our example (PR Update Care Link in Credits Page - #2131) we need to make the following changes:
From
Fixes #replace_this_text_with_the_issue_number
To
Fixes #2093
Note: This will now connect the issue and pull request both close when the pull request is successfully merged.
iii. Complete pull request (3): Explain the changes you made, then explain why these changes were needed
In bullet point form, explain the changes you made in order to complete the action items within your issue and why. @adrianang provided the following summary in PR Add Project to Website: Tech Work Experience #4911:
### What changes did you make?
  - Created new markdown file for the Tech Work Experience Project (tech-work-experience.md)
  - Added assets (project card image, project hero image, PDF overview) to their appropriate folders

### Why did you make the changes (we will use this info to test)?
  - To keep list of active HfLA projects on the website up-to-date
Note: All the bullet points addressed the action items within that issue.
In the dropdown example above Click here to see pull request #2131 example (gif), you will see 2 images get dragged into the text box and added within the <details>/<summary> tags like so:
### Screenshots of Proposed Changes Of The Website (if any, please do not include screenshots of code changes)
<!-- Notes:
- If there are no visual changes to the website, delete all of the script below and replace with "- No visual changes to the website"
- If there are visual changes to the website, include the 'before' and 'after' screenshots below.
- If your images are too big, use the <img src="" width="" length="" /> syntax instead of  to format the images
- If images are not loading properly, you might need to double check the syntax or add a newline after the closing </summary> tag
-->
<details>
<summary>Visuals before changes are applied</summary>
</details>
<details>
<summary>Visuals after changes are applied</summary>
</details>
Note: Not all pull requests will make visual changes to our website. Please do not include screenshots from VSCode / other IDE. If your pull request does not make visual changes to our website, please remove the entire<details>/<summary section and replace it with a brief summary stating that there are no visual changes, for example:
### Screenshots of Proposed Changes Of The Website  (if any, please do not screen shot code changes)

Moving files to another directory. No visual changes to the website.
NOTE: There is an automation for adding newly created pull requests to the Project Board. However, it still should be manually checked to make sure the pull request has been placed on the Project Board in case automation breaks.
After you have submitted your pull request, add it to the project board by clicking the gear icon on the right under Projects and selecting 'Project Board.'

NOTE: After completing your assignment and committing all of the changes, you must leave your current branch and return to the gh-pages branch.
Run the following command to return to the gh-pages branch:
git checkout `gh-pages`Once your pull request is merged you can delete your branch with the following command:
git branch -d update-give-link-2093Now you are all set to work on a new PR. Start over at 2.3 Where can I find GitHub issues to work on? and repeat completing parts 2 and 3.
If you find an error in your code or your reviewer asks you to make a change, please avoid editing your code directly from the pull request. Instead update it in your local branch first and then push it to your origin remote. This will update the original pull request.
For new volunteers, check this wiki on completing pull request reviews, visual demo on pull request reviews, and our wiki on creating issues for more ways to contribute to the project.
Merge conflicts occur when two or more branches of code have been modified in conflicting ways, making it difficult for the version control system to automatically merge the changes together. This often happens when two developers modify the same line of code, when one developer deletes a file that another has modified, or when one developer renames a file while another is still working on it.
Resolving merge conflicts typically involves reviewing the changes made in each branch, deciding which changes to keep, and manually editing the code to resolve the conflict.
Please check out this documentation from VSCode for more information on handling merge conflicts.
The best way to ask for help and provide as much information to the team is to do the following:
Click here for visual comment example

- Write down your blocker as a comment within your issue
- Describe the blocker and your approach to resolve the action items within the issue.
- Note which branch you are working on and make sure it has the changes you are referring to.
Click here to see how to copy a link that goes to an issue comment

- Click on the ellipsis (...) at the top right of the comment box
- Click on
Copy Link - Now paste that link in the
hfla-siteSlack channel - The Website Leadership/Merge Team will do its best to help resolve any blockers and provide guidance.
- Hack for LA's Wiki
- Wiki - Hack for LA's Site Architecture
- Wiki - Being a Part of the Hack For LA Team
- Wiki - How to review pull requests
- Wiki - How to Create Issues
- Wiki - How to read and interpret issue labels
- Wiki - How to communicate with the HfLA Website Team
- Wiki - How to work off a feature branch
- Wiki - Resolving a merge conflict on GitHub